Deploying your MONAI machine learning model within 3D Slicer

You’ve written a great MONAI PyTorch machine learning model that solves an important problem and you want to make it widely available. How do you deploy it? In this blog, we share our experience using the multiple options for deploying a MONAI PyTorch machine learning model in 3D Slicer and discuss strengths and weaknesses of each option.
Introduction
The MONAI framework is for deep machine learning for healthcare imaging, such as radiology and pathology. It is built on PyTorch and is available under a permissive license. MONAI is backed by a wide community and is managed by the MONAI Advisory Board and Working Groups. These include representatives from Stanford University, NIH National Cancer Institute, German Cancer Institute (DKFZ), Technical University of Munich (TUM), Chinese Academy of Sciences, University of Warwick, Northwestern University, Kitware, and the Mayo Clinic. MONAI is used in hundreds of GitHub projects and has been cited in over 150 published papers.
Our particular interest is the deployment of MONAI models within the 3D Slicer framework. 3D Slicer is a multi-platform, customizable tool for the visualization and manipulation of medical images. Adding MONAI models to 3D Slicer means that complex deep modeling tasks can be easily interleaved with other tasks already performed in the 3D Slicer ecosystem, further expanding this powerful tool for medical image visualization and manipulation.
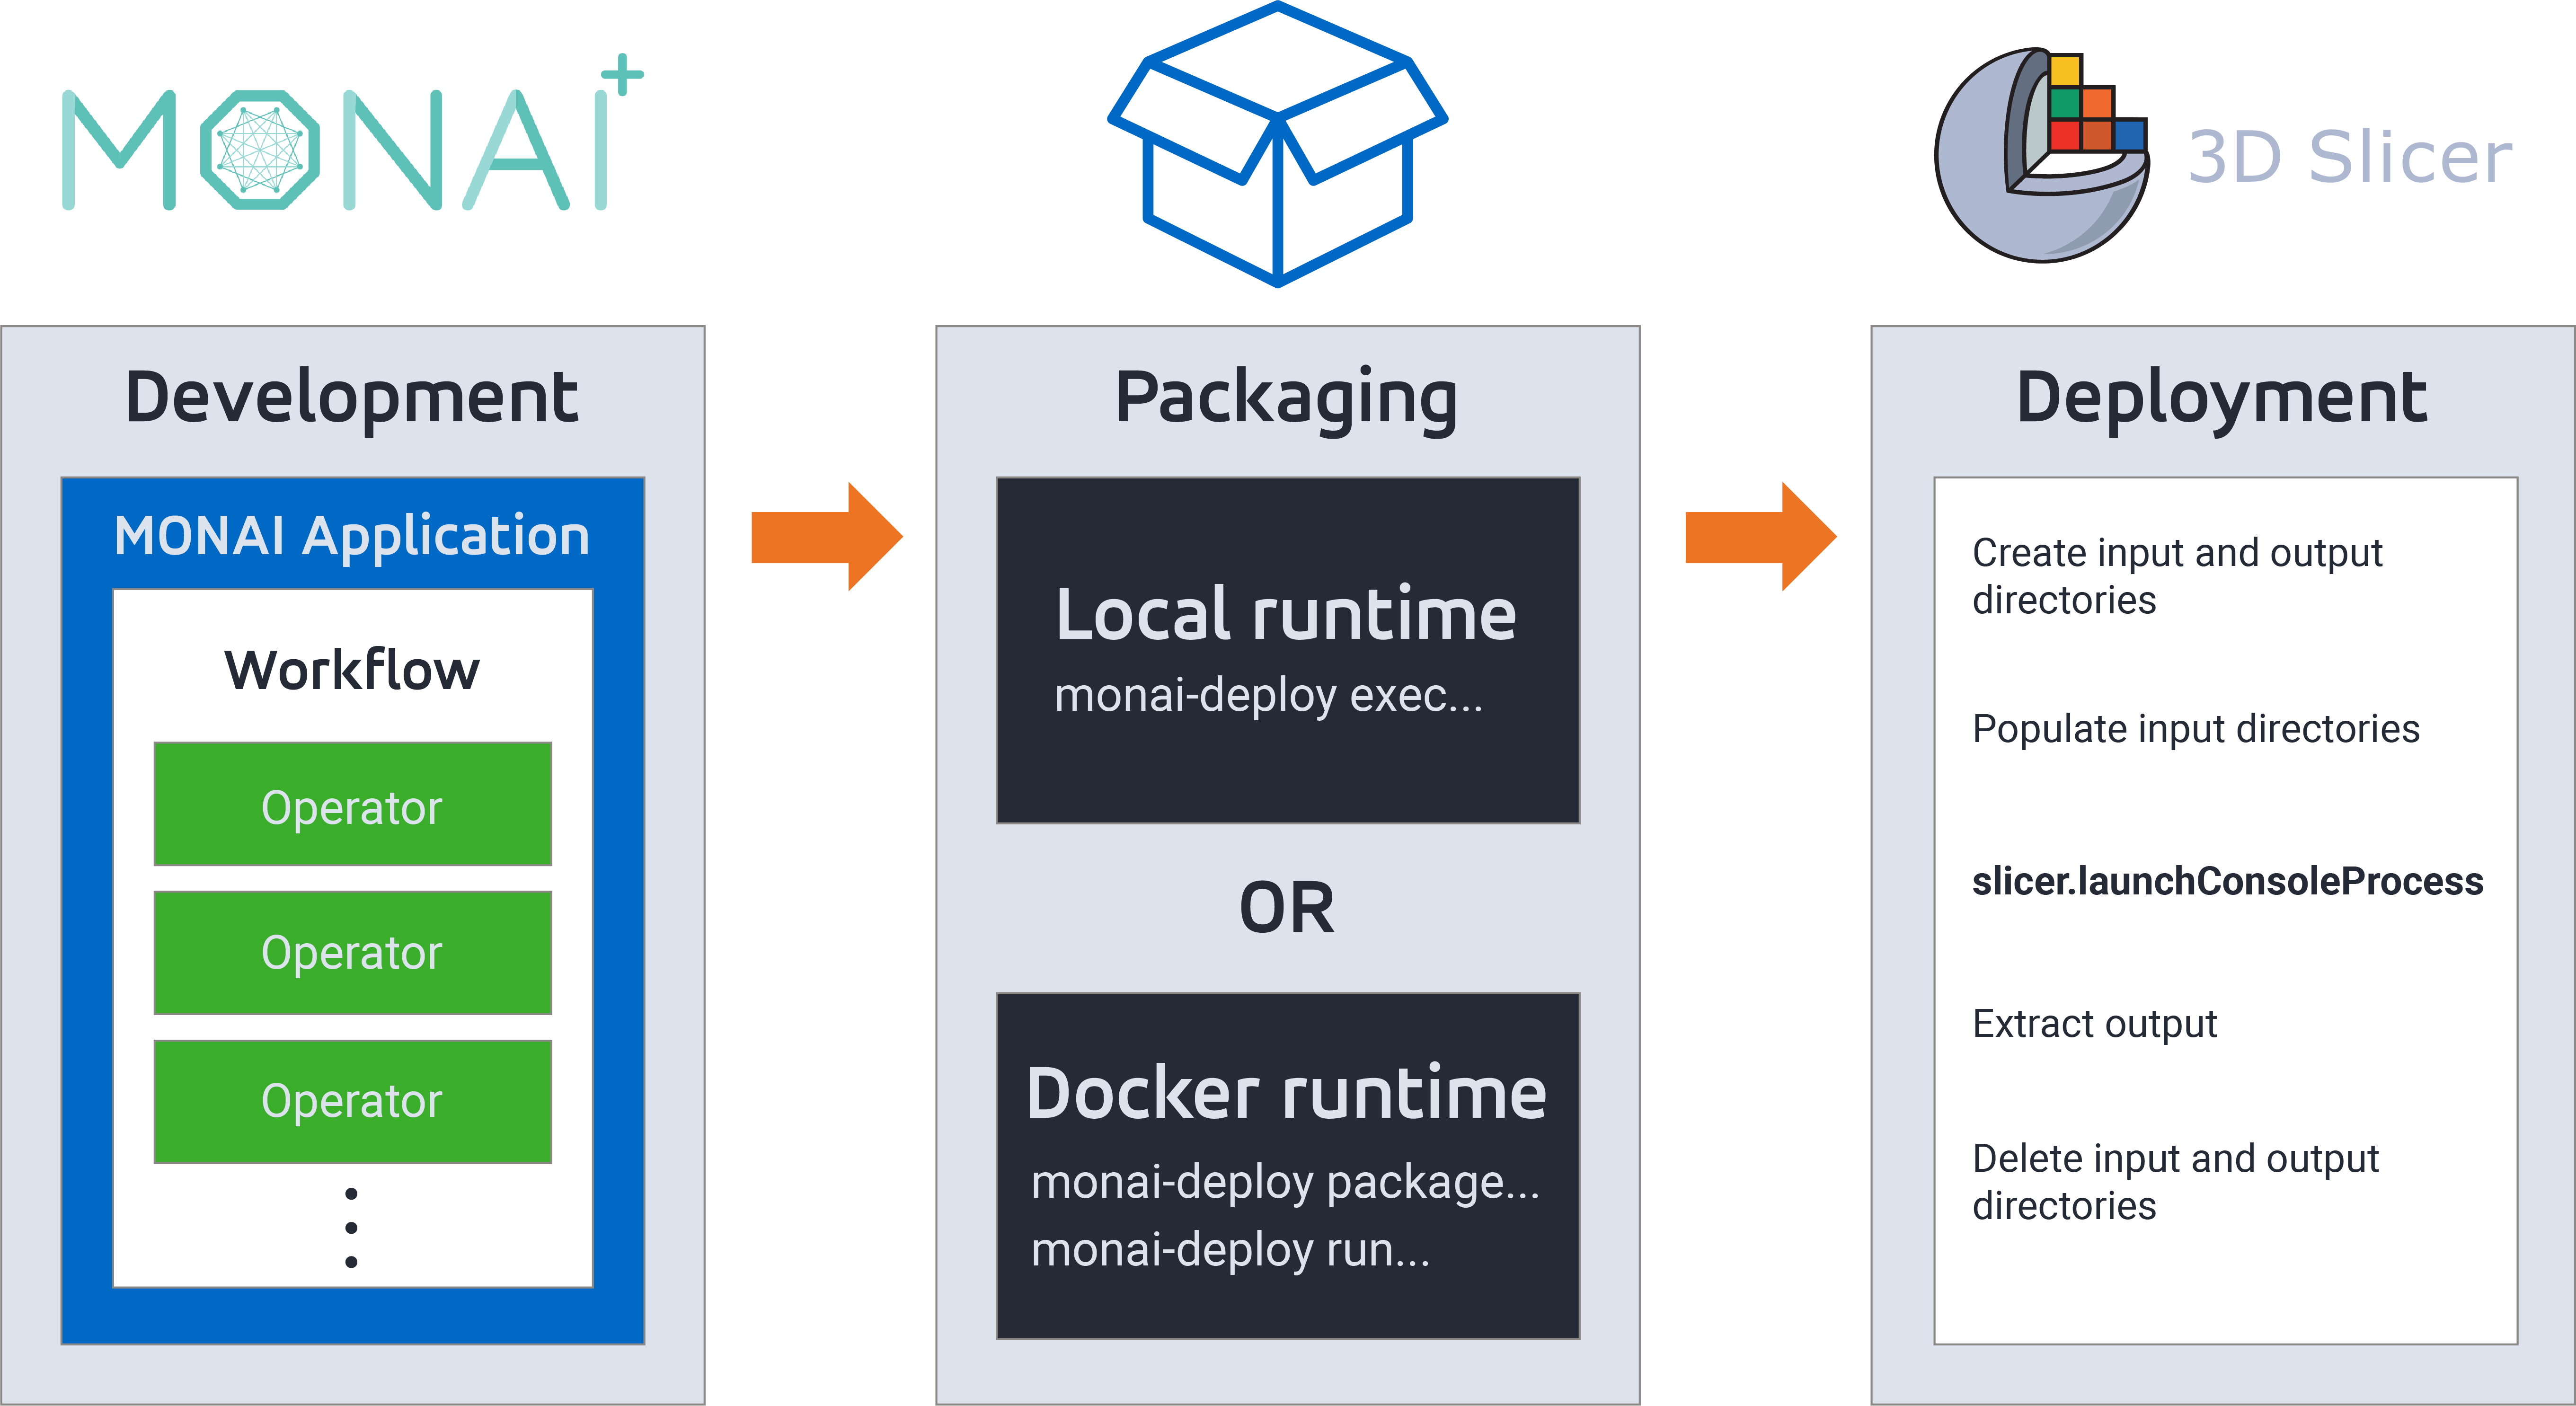
Multiple approaches for deploying a MONAI model
There are multiple options available to deploy MONAI models. From least packaged to most packaged, we will discuss exporting the model as a (1) TorchScript *.zip file, (2) MONAI Bundle, (3) MONAI Deploy application, and (4) MONAI Deploy application within a Docker image.
Let’s start with a disclaimer: especially because many of these technologies are rapidly evolving, your mileage may vary.
1. Export a TorchScript *.zip file
Since PyTorch 1.6, the default method to export a PyTorch model implementation that you have written in Python is using TorchScript, which writes a *.zip file. This will save the description of each model layer and the weights learned in training. This is better than older PyTorch file formats that supported only the off-the-shelf layers, requiring that you also separately define or import the custom layers in the environment when the model file is read in. This approach is quite fast for writing and reading back in; each requiring well under a second in our test cases.
However, the *.zip file approach required extra installation work. The environment where we wrote the file and the environment where we read the file had to be running similar versions of Python. Both environments also had to be running the same version of PyTorch, because TorchScript is not necessarily consistent between versions. Furthermore, independent of the *.zip file, we had to separately handle steps that aren’t part of a typical model or DataLoader, such as reading and writing files and pre- and post-processing that aren’t available with PyTorch.
To write a *.zip file:
torch.jit.script(my_trained_model).save(my_zip_file_name)To read a *.zip file:
my_trained_model = torch.jit.load(my_zip_file_name)my_trained_model.eval()
You must then write Python code to invoke the model.
Key takeaways
This method is very fast. It requires invoking the MONAI model from Python. If you have at most minimal pre- and post-processing and have sufficiently homogeneous computing environments, this can be a very good choice.
2. Export a MONAI Bundle
MONAI Bundle is a mechanism to package a model, and includes information on the model’s use and purpose. It includes a TorchScript model and weights, as in the *.zip file just described. It also includes at least one JSON or YAML file, which are configuration files that store metadata about the model, training, inference, and pre- and post-processing transformations. A bundle optionally also includes a plain-text description and license terms, and is configurable to include additional information. Typically, all the files of a MONAI Bundle are placed in a single *.zip file, which has contents that are a superset of the contents of a *.zip file that is for TorchScript only.
The JSON and YAML file formats are similar to XML. They are plain text, not binary, and they hierarchically save information in key-value pairs. Pretty much every piece of information you would have used to construct a model layer in Python, or to specify a data format such as numerical type or input size, or to proceed with training, etc. can be specified in the proper place in the configuration files. This is an example of what the configuration for a U-net model, a loss function, and an optimizer might look like:
"network_def": {
"_target_": "UNet",
"spatial_dims": 3,
"in_channels": 1,
"out_channels": 2,
"channels": [16, 32, 64, 128, 256],
"strides": [2, 2, 2, 2],
"num_res_units": 2,
"norm": "batch"
}"loss": {
"_target_": "DiceCELoss",
"to_onehot_y": true,
"softmax": true,
"squared_pred": true,
"batch": true
},"optimizer": {
"_target_": "torch.optim.Adam",
"params": "$@network.parameters()",
"lr": 1e-4
}
Once defined, the configuration files can be used to, for example, re-run the training via a command like
python -m monai.bundle run training \
    --meta_file configs/metadata.json \
    --config_file configs/train.json \
    --logging_file configs/logging.conf
… where the config file specifies the runner expressions to be executed.
Key takeaways
We didn’t try this approach on our own LungAIR application (see below), because we found it difficult to construct the JSON files after the Python code was developed. However, we did try out a publicly available example for spleen data. The data for training is downloaded to a local directory specified by your shell environment variable MONAI_DATA_DIRECTORY (e.g. /workspace/data). This directory name is also placed in the appropriate JSON files. Although the example creators surely wrote Python code at the same time as they wrote their JSON files, the Python code is no longer needed when invoking commands such as
python -m monai.bundle run training --config_file configs/train.jsonThere is a lot of information on how to start at bundle_intro.html and especially bundle/get_started.ipynb. The MONAI Model Zoo provides models stored in MONAI Bundle format, and that may make a good place to grab a working configuration for subsequent customization, license permitting.
3. Export with MONAI Deploy (without Docker)
You can use a MONAI Deploy package to invoke a *.zip file from a command line in a larger workflow. The monai-deploy invocation takes the workflow file, *.zip file, and input and output directories as parameters. The workflow operations are written in Python as customized subclasses of monai.deploy.core.Operator. These operators are more flexible than a PyTorch model, though invoking a PyTorch model certainly can be done from such an operator. Other possibilities for an operator include reading and writing files and using PyTorch or non-PyTorch Python code for pre- or post-processing. Any Python package dependencies for an operator are listed, and are automatically installed by monai-deploy. Instances of the operators can be strung together sequentially. More generally any output of any operator can be connected as an input to another operator in an arbitrary directed graph that is described in a customized subclass of monai.deploy.core.Application. The data types passed between operators are restricted to a few types, such as file names and tensors, but this was flexible enough for us.
However, this approach was slower for us. It took 2-3 seconds to start up our MONAI Deploy application. These few seconds were significant because we then used it for a single model prediction (including pre-processing), which took well under a second. Nonetheless, these start-up seconds could be inconsequential with an alternative scenario that has multiple predictions at a time, or with an application that sits waiting for prediction requests (see monai-deploy-app-sdk Discussion #333). Writing operators was fairly straightforward. The customized operator and application subclasses for our use case are defined in Modules/Scripted/Home/HomeLib/deploy_app.py; we demonstrate file reading and writing, pre- and post-processing, and invoking the model.
If you choose the MONAI Deploy approach, we recommend that you use a virtual Python environment. Then depending on what you want to do, you will need several Python packages including monai-deploy-app-sdk and monai. The useful-requirements.txt file in the lungair-desktop-application repository (see below) might be sufficient:
ltt install -r lungair-desktop-application/useful-requirements.txtThen with a workflow file, deploy_app.py, and a model.zip file, MONAI Deploy is invoked with:
monai-deploy exec deploy_app.py -m model.zip -i input_dir -o output_dirAny operator within the deploy_app.py can be given the input_dir and output_dir to read from and write to. If MONAI Deploy is called from within other code, that other code is responsible for placing the inputs in the input directory and finding the outputs in the output directory. We had our code create temporary directories for input and output before invoking monai-deploy.
MONAI Deploy is increasingly being used for model deployment in clinical environments. AI Deployment Engine (AIDE), developed by the UK Government-funded AI Centre for Value Based Healthcare, deploys AI models to hospitals using MONAI Deploy.
Key takeaways
The MONAI Deploy option can be slow if each individual prediction incurs start-up time. On the plus side, a user can invoke inference from a command line, with no Python programming required. Alternatively, the generic command-line interface can be invoked from almost any application written in any language; for example, an external 3D Slicer module could allow the user to choose among deployed workflows and then invoke the selected workflow. MONAI Deploy can support a complex workflow that invokes your model, which is not available if you deploy only your *.zip file. If you want to include the workflow and you have sufficiently homogeneous computing environments, this can be a very good choice.
4. Export within a Docker image using MONAI Depoly
The MONAI Deploy apparatus can instead be part of a Docker image that carries Python, MONAI, PyTorch, CUDA, and other necessary packages within it. This adds a few extra seconds to the start-up time compared to the non-Docker MONAI Deploy. Docker takes care of all versioning issues but one: the CUDA version installed within the Docker image has to be modern enough to support the current computer’s GPU. See the discussion on this in the Tips and Best Practices section below.
The created Docker image can be pushed, e.g., to
ghcr.io/my_organization_in_lower_case/my_repository/my_image_name:latestIn any environment that supports the nvidia-docker2 package (e.g. installed with apt install nvidia-docker2 on Ubuntu Linux), the Docker image will be automatically retrieved (i.e. docker pull) the first time it is needed. Our image is 18–20 GiB in size and may take 25 minutes to retrieve on a 100 Mbps connection. Alternatively, an explicit docker pull will retrieve it earlier, perhaps as part of a build or installation process.
To build the Docker image:
monai-deploy package \
    my_deploy_app.py \
        -b nvcr.io/nvidia/pytorch:22.09-py3 \
        --model model.zip \
        --tag ghcr.io/my_organization_in_lower_case/my_repository/my_image_name:latest
Note that the -b nvcr.io/nvidia/pytorch:22.09-py3 option gives the September 2022 version of a publicly available Docker image, overriding the default value of nvcr.io/nvidia/pytorch:21.07-py3 from July 2021, in order to get a newer version of CUDA and thus support for more GPUs.
With adequate permissions from the repository or its organization, you can push the created Docker image to ghcr.io with
docker push ghcr.io/my_organization_in_lower_case/my_repository/my_image_name:latestNote that if you have never done this on your computer, you will first have to prove your credentials with
docker login -u my_github_username --password-stdin ghcr.ioand supply a personal access token generated at github.com.
To launch MONAI Deploy within the Docker image (whether pushed to a public location or local):
monai-deploy run \
    ghcr.io/my_organization_in_lower_case/my_repository/my_image_name:latest \
    input_dir output_dir
Key takeaways
MONAI Deploy with or without Docker can be slow if start-up time must be incurred for each individual prediction. The first download of a published Docker image can be slow and it may cost money to make a large image available for public download. However, MONAI Deploy within a Docker image has all the advantages of MONAI Deploy without Docker – see above. Plus, it almost completely removes the need for homogeneous computing environments. Except for the issue that we were having with CUDA versioning and new GPUs, the use of a Docker image means that a paired workflow and model can easily be deployed to diverse working environments.
Conclusions
If you want to package only the PyTorch model for use in Python code in a similar computing environment then a *.zip file may be your best choice. If you are looking to include human- and computer-parsable metadata about training, data types, post-processing transformations, etc. then MONAI Bundle may be your best choice. If you want to package your model into a command line tool that can be run in a clinical environment then MONAI Deploy may be your best choice. If you further don’t want the user to have to worry about installing Python and its dependencies such as MONAI and PyTorch then MONAI Deploy within a Docker image may be your best choice.
| TorchScript-only *.zip file | MONAI Bundle | MONAI Deploy | MONAI Deploy within Docker | |
| Invoke package from | Python | Command line | Command line | Command line |
| Speed | Very fast | Not tested | Adds ~3 seconds | Adds ~10 seconds |
| Supports a MONAI model | Yes | Yes | Yes | Yes |
| Directly supports metadata via JSON / YAML files | No | Yes | Yes | Yes |
| Directly supports workflow, such as file i/o and pre- and post-processing | No | Limited* | Yes | Yes |
| Works even if the development and deployment environments have significantly different Python and package versions | No | No** | No** | Yes |
| Works even if the deployment environment has a CUDA version that is too old to support the GPU | No | No | No | Yes |
| Works even if the Docker environment has a CUDA version that is too old to support the GPU | n/a | n/a | n/a | No |
** MONAI is very good about tracking version information. Although you are still responsible for making sure that they are installed, MONAI Bundle will tell you what versions it is expecting.
Tips and Best Practices
Here is some additional information to help you avoid some of the pitfalls we stumbled into.
- To synchronize the development and deployment environments, consider using Python virtual environments. The
light-the-torchutility worked best for us for installing PyTorch. It was better than trying to automatically determine the current environment and then explicitly specifying a Python wheel.pip install light-the-torch
# Use `ltt` instead of `pip` to install torch and other requirements
- To get consistent Python packages in each virtual environment, use
In theory this can be done inside a Docker image as well (with a subsequentltt install -r lungair-desktop-application/useful-requirements.txtdocker committo save the updated image), but we had better results by instead starting with a modern Docker image such asnvcr.io/nvidia/pytorch:22.09-py3(described here).
- We had trouble with CUDA versioning; if the deployment environment (whether or not within a Docker image) has an old version of CUDA, it may not support a modern GPU. In the case of using the Docker image, MONAI Deploy currently builds the image on top of a base Docker image
nvcr.io/nvidia/pytorch:21.07-py3from July 2021 by default, though this can (and should) be overridden withmonai-deploy package -b …. See monai-deploy-app-sdk Discussion #358 for more information.
- Behind the scenes, installation of PyTorch depends on the CUDA version. If you update a CUDA version in an environment, you probably will have to reinstall PyTorch.
LungAIR project

This effort is part of the Lung Aeration and Irregular Opacities Radiological Analyzer (LungAIR) project. In this project, we are developing and validating a new software technology that integrates electronic health records (EHR) with quantitative lung imaging to predict the risk and assess the severity of respiratory disease in premature babies. The LungAIR desktop application is a customized 3D Slicer application.
To see how we adapted the LungAIR application to the concepts described in this article, see the coding differences on GitHub, especially for Modules/Scripted/Home/HomeLib/deploy_app.py.
Collaborating with Kitware on your MONAI projects
Kitware is actively involved in various projects in the MONAI ecosystem. We can apply our domain expertise to help you integrate the power of MONAI into your healthcare medical imaging solutions. Contact our team for more information.
Acknowledgments
The research reported in this publication was supported by the National Heart, Lung, And Blood Institute of the National Institutes of Health under Award Number R42HL145669. The content is solely the responsibility of the authors and does not necessarily represent the official views of the National Institutes of Health.