Introducing Physically Based Rendering with VTK
Introduction
Until VTK 8.2, surface shading through the vtkPolyDataMapper is computed using the Phong reflectance model. While it achieves plausible results, it requires the user to specify the parameters to define materials and that he should be familiar with: the ambient color (RGB), the diffuse color (RGB), the specular color (RGB), and the specular power (positive floating value).
There are several drawbacks to this model though. The parameters are not physically based, difficult to define, and they are only heuristics that can lead to non-plausible materials if not carefully set. Moreover, this model does not ensure light energy conservation (the object can emit more light than it has received). Finally, changing the environment does not affect the model shading and requires that the parameters be tuned accordingly.
Starting from VTK 9.0 (and already available on the master branch), an alternative reflectance model, based on the microfacet theory – commonly called Physically Based Rendering (PBR) – is added to the vtkPolyDataMapper. This new model is physically based (thus enforcing light energy conservation), the parameters are simpler, more intuitive, and are environment agnostic. The diffuse and specular parts are not explicitly set by the user but internally computed based on those parameters. This ensures that those parts, which are mutually exclusive, correspond to the input light energy. All of these details make surface rendering a lot more realistic! This article will describe in-depth how to use and parameterize this new model.
Parameters
In order to enable this new shading model on a specific actor in the scene, you just have to change its interpolation/shading model by callingvtkProperty::SetInterpolationToPBR(). Then, all the required parameters of this model are listed below:
- Base Color (RGB): also called albedo, this is the perceived color of the object, the diffuse color for non-metallic objects or the specular color for metallic objects. This is set using the usual
vtkProperty::SetColor(). - Metallic (float): in the real world, common objects are either metallic or non-metallic (called dielectric) and the shading computation is different depending on this parameter. For most materials, the value is either 0.0 or 1.0 but any value in between is valid. This is set using
vtkProperty::SetMetallic(value). - Roughness (float): parameter used to specify how an object is glossy. This is set using
vtkProperty::SetRoughness(value)
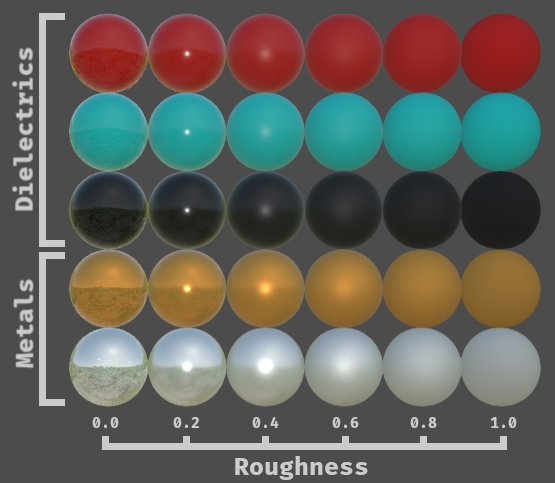
As you can see in Figure 2, configuring a material is by far easier and more intuitive with this new model. Note how the Fresnel effect is visible at grazing angles, this effect is not visible with the classic shading model. More importantly, glossy materials (low roughness value) are reflecting the environment with a technique called Image-Based Lighting that is supported by the PBR shading model.
It is also interesting to understand what is the difference between metals and non-metals. Metals have no diffuse part and a chromatic specular contribution, while non-metals have a diffuse color and an achromatic specular part. The two spheres in Figure 3 have the same base color and the same roughness.
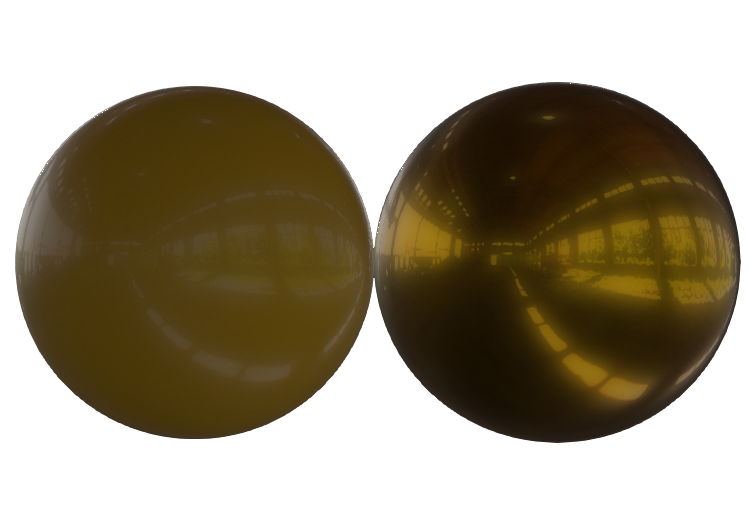
Image-Based Lighting
In order to bring realism a step further, we have implemented Image-Based Lighting that allows the user to specify the environment with a cubemap texture. A cubemap texture is a texture consisting of 6 seamless images for the 6 different directions of the 3D space. Please, refer to vtkTexture::CubeMapOn() documentation to know how to create a cubemap. Note that it is important that this cubemap is in linear color space. Figure 4 illustrates the expected order of the vtkTexture input connections.

vtkTexture cubemap.The feature is easily enabled calling the method vtkRenderer::UseImageBasedLightingOn() and setting the previously created cubemap with vtkRenderer::SetEnvironmentCubeMap().
When using this feature, a quick precomputation is done by the rendering engine that allows the object to take into account the environment when computing the diffuse and the specular parts. Glossy objects will then display nice reflections of this environment.
A new tool has also be introduced to facilitate the creation of the cubemap if you have a standard projected equirectangular environment texture. Please refer to vtkEquirectangularToCubeMapTexture.
Parameters mapping
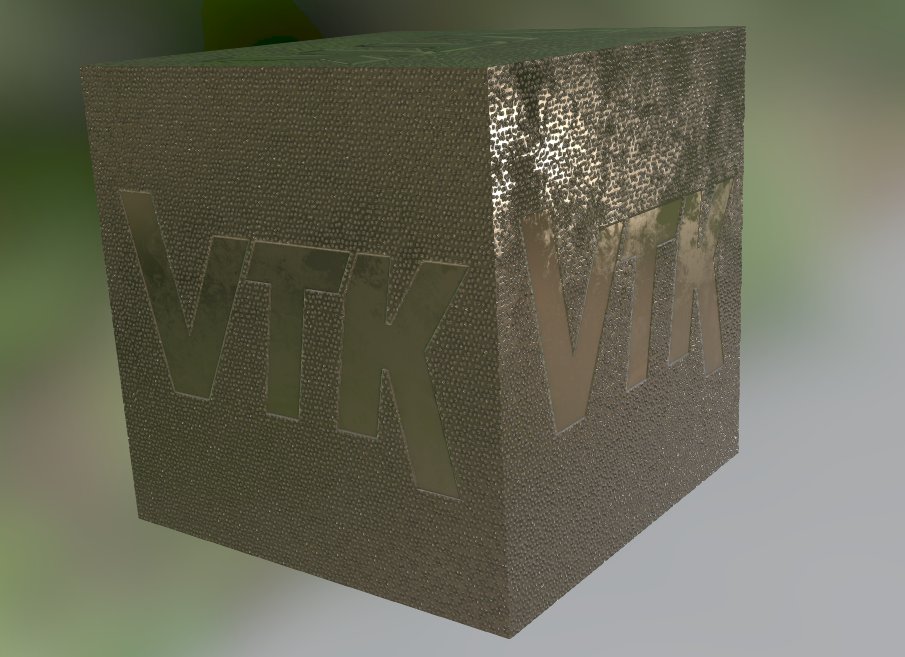
Applying a color texture was already possible with the classic shading model. Of course, the texture coordinates are mandatory in the vtkPolyData point attributes. The PBR model adds the ability to map a material property texture called ORM texture where the 3 RGB channels of the image are respectively the Occlusion factor, the Roughness factor, and the Metalness factor. This texture format is widely adopted in digital creation contents and is supported by the recently added VTK glTF reader.
While we have already mentioned the roughness and metalness parameters, a new property (the occlusion) is supported when using an ORM texture. This factor darkens some parts of the model, simulating a cheap ambient occlusion, greatly improving 3D perception as depicted in Figure 5.
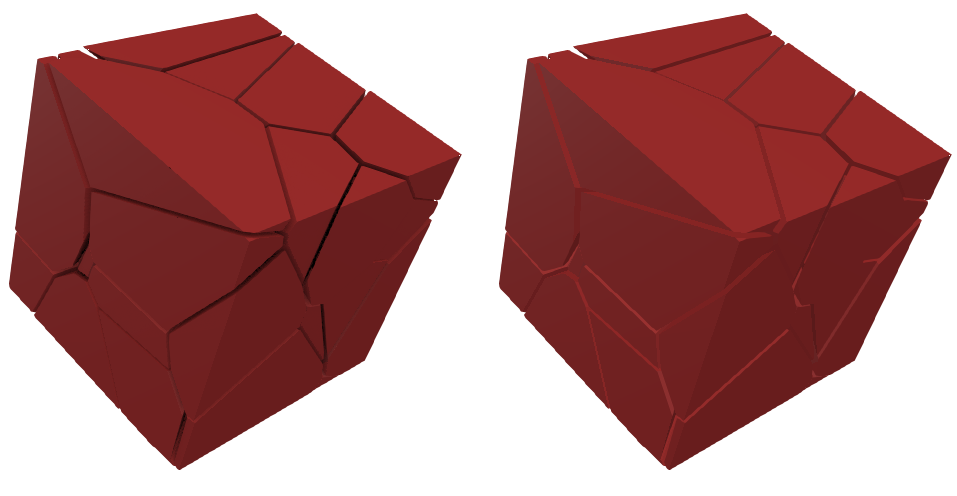
an Ambient Occlusion texture (R channel of ORM texture) applied to the left cube.
Another optional texture, the emissive texture, is also supported by this new shading model in order to simulate an emissive object (car lights for example). This texture is an RGB texture in order to specify the emissive color, and a factor can be set to set the power of the light emission.
Normal mapping
On top of this, we have added the normal mapping technique, valid for both shading models. If a normal texture is added to the property of the actor and the model contains normals, texture coordinates, and tangents, the feature is enabled and small details appear on the model even if it has a low polys count as you can see in Figure 6.
The tangents can be computed if you have only texture coordinates and normals using a new filter called vtkPolyDataTangents.
Example
It is now easy to import modern digital content into VTK. With all the features enabled (do not underrate the benefits of the Image-Based Lighting!), the rendering is now a lot more realistic at almost no additional computational cost. Whether the digital content is the center of interest or only the context around your scientific visualization, give it a try! Here is a simple C++ example showcasing all new methods and how simple it is.
vtkActor* actor; // the actor
vtkTexture* cubemap; // texture containing the cubemap
vtkRenderer* renderer; // the renderer

// ... usual object creation and initialization is hidden here

renderer->UseImageBasedLightingOn();
renderer->SetEnvironmentCubeMap(cubemap);
actor->GetProperty()->SetInterpolationToPBR();

// configure the basic properties
actor->GetProperty()->SetColor(r, g, b);
actor->GetProperty()->SetMetallic(metallicCoefficient);
actor->GetProperty()->SetRoughness(roughnessCoefficient);

// configure textures (needs tcoords on the mesh)
actor->GetProperty()->SetBaseColorTexture(colorTexture);

actor->GetProperty()->SetORMTexture(ormTexture);
actor->GetProperty()->SetOcclusionStrength(occlusionStrength);

actor->GetProperty()->SetEmissiveTexture(emissiveTexture);
actor->GetProperty()->SetEmissiveFactor(emissiveFactor);

// needs tcoords, normals and tangents on the mesh
actor->GetProperty()->SetNormalTexture(normalTexture);
actor->GetProperty()->SetNormalScale(normalScale);
Future work
While this is a major step toward realistic rendering, there is still room for improvement. Here are a few advanced techniques that are not implemented yet and that we have in mind:
- PBR Clear Coat support;
- PBR Anisotropy;
- Screen Space Reflection (SSR);
- Subsurface scattering (SSS);
- Parallax mapping;
- Emissive bloom;
- HDR Environment maps
All the PBR features presented in this article are already available in VTK master and will be available in the upcoming VTK 9.0 release. Moreover, the integration of this technology has already been done in ParaView and another blog article will be dedicated to it.
Acknowledgments
This work is part of the innovative effort of the SciViz team from Kitware SAS (France) and was partly funded by the VESTEC project.
 The VESTEC project has received funding from the European Union’s Horizon 2020 Programme for research, technological development and demonstration under grant agreement no 800904.
A very impressive article. This type of rendering is so realistic. I have created a couple of examples (both in C++ and Python) that (I hope) capture most of what you have written.
Here are the C++ examples, links to the corresponding Python examples can be found on these pages:
1. [PhysicallyBasedRendering](https://lorensen.github.io/VTKExamples/site/Cxx/Rendering/PhysicallyBasedRendering/
2. Skybox_PBR
WOW, thanks for including this. Being used to working with Blender this makes it much easier for me to make better looking scenes. Can’t wait till vtk9.0 become widely available. Will give it a try with the master branch when I find some time.
I’m wondering if you can help.
I added PhysicallyBasedRendering and Skybox PBR to the vtk-examples site a while back.
I am now seeing this warning:
If you look in the code these are set to On so something has changed. Any ideas or fixes?
Hi Andrew,
We added support for HDR images in VTK 9.0. For performances, the skybox texture should set
MipmapOnas well asInterpolateOnto exploit hardware capabilities when using HDR images.If one is using a cubemap texture (and not a traditional texture), one should set
UseSphericalHarmonicsOffon the texture as well.Thankyou Paul, I have implemented those changes in the vtk-examples.