Automated GUI Testing with CTest/CDash and Sikuli

Testing sofware with Graphcical user interfaces (GUIs) can be more challenging than testing command line software. This is because GUIs require a mouse or other human interface system to drive them. Tesing a GUI involves being able to record human interactions and play them back later. There are a variety of tools available for GUI testing, but many are constrained to a particular platform, GUI toolkit or development language. There are also many commercial GUI testing tools. In this blog we will look at an open source solution for GUI testing called Sikuli. In particular we will look at how it can be driven from CTest and used to populate a CDash dashboard. The example project we will present is testing a Vista GUI written in Delphi for OSEHRA.
About Sikuli
Sikuli is an open source cross-platform project released under the MIT License, that started as a project in the "User Interface Design Group" at MIT. It is a cross-platform GUI testing/automation tool that uses OpenCV to search the computer's screen for anchor images and Jython to control the mouse and keyboard to interact with what it finds. This allows greater freedom when testing as you can interact with any GUI that can be seen on a computer screen.
For a more detailed look at the workings of Sikuli look at the design documentation.
Sikuli's source code is available on Github:
IDE: https://github.com/RaiMan/SikuliX-IDE
API: https://github.com/RaiMan/SikuliX-API
A typical Sikuli "script" is a folder with ".sikuli" in the name create by the Sikuli IDE . The folder usually contains a few common pieces:
- a Python file containing commands, used when running the script
- An HTML file that mirrors the Python file, used for display in the IDE
- A series of PNG files which are used as arguments for commands used in the OpenCV searching.
The Sikuli website has many demonstration videos with example scripts created with the IDE.
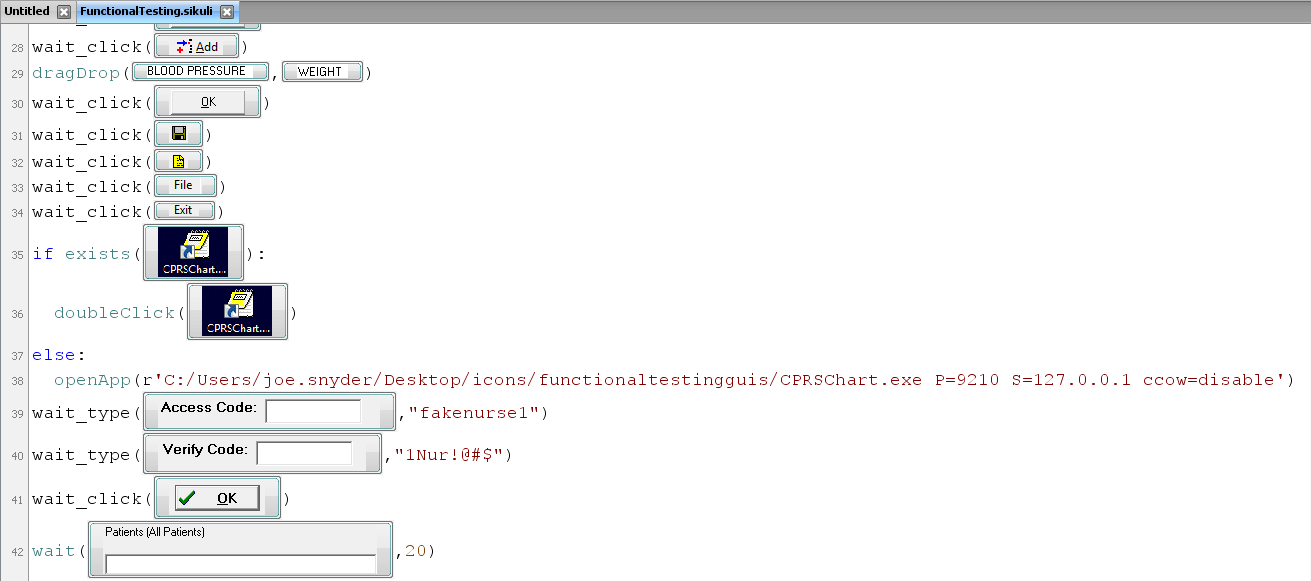
The screenshot below is the OSEHRA Sikuli script in the Sikuli IDE. It shows the the commands that will be run, dragDrop or doubleClick, and then the image arguments which go with those commands. The wait_click is a user-created function to reduce the number of commands needed. The function does what the name describes: it waits for each image to appear on screen before clicking on it.
To see Sikuli in action watch this video:
The video shows the two run modes options that are available from the IDE. The “slow-motion” mode of Sikuli flashes those red circles around the mouse to denote that a matching object is found on the screen. The slow motion mode is excellent for initial object finding, but quickly becomes a hassle when using right-click. The circle overlay acts as a new window which would close a right-click menu, removing the found object and stopping the script. At 0:30 into the video, the video transitions to show the regular speed actions of Sikuli.
These steps utilize the x1.0-rc3 version of Sikuli.
The downsides to Sikuli
The use of screen captures as the input for finding components can lead to some trouble. Differences in the window styling on different platforms or changing the resolution of a monitor can lead to objects not being found. Sikuli's keyboard and mouse control during a test run require that the computer not be in use when tests are running. This is good for dedicated test machines and nightly test runs. However, for testing during development, it can be disruptive to the development process not allowing the developer to multi-task during the test runs.
Sikuli integration with CTest/CDash
To integrate Sikuli with CTest for automated testing, we will utilize Sikuli's command line signature to run scripts. We will demonstrate the integration of a Sikuli test into a project, with the code needed in the CMakeLists.txt and in the Python file of the Sikuli test. It will cover a few major points:
- Necessary steps in a CMakeLists.txt file
- Code in Sikuli's Python file
- Running and reviewing tests
The following blocks show the required code.
Key:
| Commands found in CMakeList.txt |
| Command found in Sikuli Python script |
| Capture of Command LIne |
First, use a find_program command to locate the sikuli-ide file to run and, if necessary, find the path to any executables that going to be tested.
| find_program(SIKULI_EXECUTABLE sikuli-IDE.bat sikuli-IDE.sh DOC "Path to the sikuli-IDE file" HINTS "C:/Program Files/Sikuli X/" "C:/Program Files (x86)/Sikuli X/" "/usr/local/") |
Next, configure the Python and HTML files to account for local paths to executables or other platform specific information:
| configure_file("${sikuli}/${sikuli_name}.py.in" ${CMAKE_CURRENT_BINARY_DIR}/Sikuli/${sikuli_name}.sikuli/${sikuli_name}.py") configure_file("${sikuli}/${sikuli_name}.html.in" ${CMAKE_CURRENT_BINARY_DIR}/Sikuli/${sikuli_name}.sikuli/${sikuli_name}.html") |
The test command is simple to craft and will use two arguments from Sikuli's command line signature
- -s
- redirects error messages to stderr instead of a pop-up window
- -r <path_to_folder>.sikuli
- Run a Sikuli script. The path that is passed should be to the .sikuli folder that contains the Python file.
The OSEHRA Test command, which passes the path to the folder that contains the configured file as the value of the '-r' argument, looks as follows:
| add_test(FT_${sikuli_name} Sikuli "${SIKULI_EXECUTABLE}" -s -r "${CMAKE_CURRENT_BINARY_DIR}/Sikuli/${sikuli_name}.sikuli") |
By default, Sikuli does not return 0 for pass and non zero for failure as CTest expects. This requires the user to explicitly return 0 for passing and non zero on failure in the python script. Alternatively, you can print passing and failing messages from the script and use the CTest PASS_REGULAR_EXPRESSION property to determine passing and failing states.
| set_tests_properties(FT_${sikuli_name}Sikuli PROPERTIES PASS_REGULAR_EXPRESSION "Script Completed") |
In the Sikuli Python file
An example of the Python file to be configured would look something like the following screenshot, taken from the OSEHRA testing files. Here we can see the configuration ability is used to enter the path to a local executable and set up the connection arguments that it requires.
|
import sys
addImagePath("${sikuli}")
wait(30)
if exists("1326480962420.png"):
doubleClick("1326480962420.png")
else:
openApp(r'${VITALS_MANAGER_EXECUTABLE} /port=${VISTA_TCP_PORT} /server=${VISTA_TCP_HOST} /ccow=disable')
wait_type("AccessCcndc.png","fakedoc1")
wait_type("VerifyCcndc.png","1Doc!@#$")
wait_click("1320870115117.png")
wait(Pattern("Templates1Va.png").targetOffset(0,-14),10)
wait_click(Pattern("Templates1Va.png").targetOffset(0,-14))
…
|
There is one important command to be used in the scenarios where the test file will need to be configured. If the test file is configured and placed in a different location from the original file, it is recommended that you utilize an addImagePath command to specify the folder location of the source, which can be found on the second line of the above code fragment. This command adds the supplied path to the set of paths that are used to find the images used in the file's commands.
To ensure that the test's result is captured correctly, the Sikuli script can either print a message to be matched by CTests PASS_REGULAR_EXPRESSION test property that is set in the CMakeLists.txt file:
|
# type("Exit") print "Script Completed" |
Or, an explicit return value can be returned:
|
import sys sys.exit(0) |
Running the test & examining results
After the CMake configure, generate, and build, the test can now be run like any other CTest test:
|
$ ctest -R FT_FunctionalTestingSikuli -V 150: Test command: "C:\Program Files (x86)\Sikuli X\Sikuli-IDE.bat" "-s" "-r" "C:/Users/joe.snyder/Work/OSEHRA/VistA-build/Testing/Functional/Sikuli/FunctionalTesting.sikuli" <snip> |
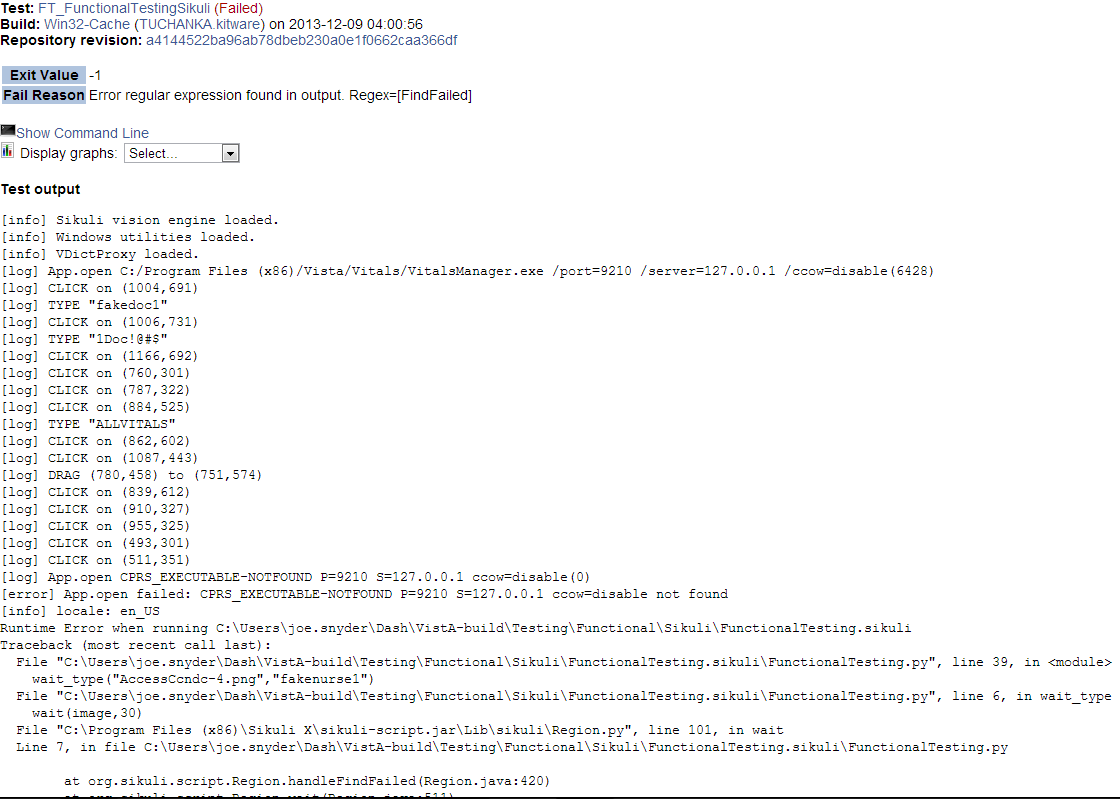
Sikuli does an excellent job of logging the actions that it performs through the stdout pipe. The type strings are captured in the log and the click functions log the screen coordinates where the click was performed. The logging is also captured well in the Dashboard Testing display:
A successful test as displayed in CDash:

A failed run:
Conclusion
Sikuli is a very powerful open-source tool that allows testing on any GUI that can be seen on a user's screen by searching the screen for a section that maches a supplied screenshot. It integrates well into a CMake/CTest environment due to its command line capabilities. Sikuli records the actions that it performs by keeping screen coordinates of clicks and the strings that are being sent to a type function during the course of a run. This logging displays the output of the test both on the command line and in the Dashboard's output display. Sikuli isn't without it shortcomings. For example, screen resolution changes can cause it to fail. In addition, the anchor images of the components will also need need to be more carefully maintained when dealing with changing the GUI components and updating the tests. Sikuli's control over the mouse and keyboard can prove disruptive when testing while attempting to do other work, but for overnight submissions or dedicated test machines this is not a problem.
Hi,
We worked on this few years, it worked pretty well.
Here is the corresponding midas journal:
http://www.midasjournal.org/browse/publication/822
Not so sure, what’s new?
Arnaud
Hi Arnaud,
I apologize, I didn’t know that this blog had essentially already been written. The linked article is another good exploration of Sikuli, dealing with more Keyboard interaction that the OSEHRA script does. The strengths, weaknesses, and setup in your submission are very much in line with the ones here.
After reading through the linked submission, the novel part of this seems to be that the newer[?] versions of Sikuli are more compatible with Windows environments. This blog focuses entirely on setting up a test for a GUI that only runs on Windows.
Thanks for the link,
Joe
We used Sikuli and it is indeed a great tool for automated GUI testing, but unfortunately it seems to be abandoned and the user support is terrible.
There are some blocking issues that prevent us from really using it, such as the fact that Sikuli cannot perform tests on a locked Windows computer, and all our tests would run on such a machine.
I would love to see Sikuli being developed again and them responding to user requests!