CTest and CDash: Testing without a build system

You can send build and test information to CDash even if you aren’t using CMake to build your software. In this blog post, we’ll walk through the steps to set up CTest-driven testing that reports to a CDash dashboard.
Following the example of the CMake tutorial where a C++ executable is created to calculate the square root of an input number, we’ll create a testing system for a simple Python program called py_square.py which performs the same function. For this example, we’ll assume that this file is contained in a folder called py_example:
--- Current folder structure ----

py_example
  \
   \- py_square.py    <--- New
and our Python file contains the following commands:
import math
import argparse

def myMath():
    parser = argparse.ArgumentParser(description="Simply return square root of number",
                                        formatter_class=argparse.ArgumentDefaultsHelpFormatter)
    parser.add_argument("--input", help="Number of interest",required=True, type=int)
    args = parser.parse_args()
    print("Square root of %s is %f" % (args.input, math.sqrt(args.input)))

if __name__ == "__main__":
    myMath()
Setting up CTest
Using CTest to submit to a CDash instance without building an executable or a library with CMake is a well established process. You’ll use the command include(CTest) to enable the functionality to define tests and report results to CDash. You can define your own tests from scratch, or use existing testing frameworks like PyTest or GoogleTest. Many projects use CTest and CDash without relying on CMake to generate a build system for them. CDash is a great example of this. For more information about how CDash’s tests are defined, you can look into the app/cdash/tests or the tests directory.
As with any CMake system, you’ll need to create a top-level CMakeLists.txt file
--- Current folder structure ----
py_example
  \
   | - py_square.py
   | - CMakeLists.txt    <--- New
And we add the following lines to that CMakeLists.txt: a project command and a cmake_minimum_required command. The project command should be written with one of the optional parameters, LANGUAGES which should be set to NONE. This will ensure that CMake doesn’t perform any compiler or checking on the capabilities of a build system.
cmake_minimum_required(VERSION 3.15)
project(simpleExample LANGUAGES NONE)
Next, we’ll use the find_package command or search the file system, using commands like find_library or find_program, for all the libraries and programs that we need in order to properly execute our tests. This could be searching for other testing frameworks that CTest can work with, or executables to directly run the programs we need. In this example, we’ll look for the Python3 package to allow us access to the Python interpreter rather than searching for the executable directly.
# Find Python 3 executable, fail if we can't find it via REQUIRED
find_package (Python3 COMPONENTS Interpreter REQUIRED)
We’ll ensure the CTest module is included so we can create tests:
include(CTest)After that, given that we now can use the Python executable, we can start to add tests around the execution of our simple Python file using the add_test command. First we can add a test to ensure that the help text is printed if the right flag is given. By default, ctest considers an exit status of zero to mean that the test passed. We’ll override this default behavior by setting the PASS_REGULAR_EXPRESSION property for this test. This allows us to set a string of text or regular expression that will cause the test to pass if the expression matches. If the expression is not found, the test will fail.
# Set a variable so we can use it later
set(test_file "py_square.py")

# First test to ensure help information
add_test(help_test ${Python3_EXECUTABLE} ${CMAKE_SOURCE_DIR}/${test_file} -h)
set_property(TEST help_test PROPERTY PASS_REGULAR_EXPRESSION "usage: ${test_file}")
We can also check for the expected output when a valid number is passed to the program using a slightly different add test command and new text in the PASS_REGULAR_EXPRESSION property.
add_test(5_test ${Python3_EXECUTABLE} ${CMAKE_SOURCE_DIR}/${test_file} --input 5)
set_property(TEST 5_test PROPERTY PASS_REGULAR_EXPRESSION "Square root of 5 is 2.236068")
Additionally, for testing error cases, we could set a property, called WILL_FAIL, that we expect that the run of the test will go poorly. If the run of the command returns with a non-zero value, the test will pass; if it returns successfully, the test will fail. We can show this by executing the script with the value of -1 when the Python program has done no work to ensure that a value isn’t negative.
# Test error throwing
add_test(fail_test ${Python3_EXECUTABLE} ${CMAKE_SOURCE_DIR}/${test_file} --input -1)
set_property(TEST fail_test PROPERTY WILL_FAIL true)
Using Testing Suites
--- Current folder structure ----
py_example
  \
   | - py_square.py   <--- Editing
   | - CMakeLists.txt
If the software uses an existing testing framework, you could use the above pattern of using the add_test command to capture either a single test run or even a subset of the tests in an invocation of CTest. Using a function, like TODO 9 of Step 5 of the CMake Tutorial, you can repetitively add a test using a function with parameters that can be changed to create the differences between each test.
For our example, we’ll be using PyTest to have a separate set of testing within the py_example file. We’ll create three simple tests to execute, then use the “-K” option to filter the PyTest invocation to only run one of those items in each execution. The arguments that we’ll use in this case is the name of the individual test within the PyTest suite.
Our new Python code would look like this:
import math
import argparse

def myMath():
    parser = argparse.ArgumentParser(description="Simply return square root of number",
                                        formatter_class=argparse.ArgumentDefaultsHelpFormatter)
    parser.add_argument("--input", help="Number of interest",required=True, type=int)
    args = parser.parse_args()
    print("Square root of %s is %f" % (args.input, math.sqrt(args.input)))

# New Test additions

def test_answer2():
    assert math.sqrt(4)  == 2

def test_answer4():
    assert math.sqrt(16)  == 4

# This one fails
def test_answer3():
    assert math.sqrt(9)  == 4

# end testing additions

if __name__ == "__main__":
    myMath()
And we could add the following to our top-level CMakeLists.txt file to find the pytest executable, set up a reusable function to generate a test, and then invoke that function a few times to add those tests to the list for CTest to run. In this case, we’ll use a test property called FAIL_REGULAR_EXPRESSION which will fail the test if “FAILED” appears in the output which matches how PyTest denotes that a test was not successful.
--- Current folder structure ----
py_example
  \
   | - py_square.py
   | - CMakeLists.txt    <--- Editing
# Simple PyTest integration
find_program(PYTEST_EXEC pytest pytest.exe)

function(add_pytest_test testName)
  add_test(test_${testName} ${PYTEST_EXEC} ${CMAKE_SOURCE_DIR}/${test_file} -k ${testName})
  set_property(TEST test_${testName} PROPERTY FAIL_REGULAR_EXPRESSION "FAILED")
endfunction()

add_pytest_test("answer2")
add_pytest_test("answer3")
add_pytest_test("answer4")
Communicating with CDash
Now that we’ve defined a set of tests we can set up the files that CTest will use to communicate with a running CDash instance. This consists of downloading a file from the server that is available after a project is created and placing it in the source directory of our repository. This file, called CTestConfig.cmake, describes the CDash instance and the project that the data from the uploaded files will belong to.
Creating the project
A good place to start exploring the capabilities of CDash is my.cdash.org. This instance is configured to allow any registered user to create a project and begin submitting data without further configuration. This blog will assume that it is the instance that we’ll submit to, but the steps could be replicated on any CDash instance where your account has permission to create new projects.
First, sign in and visit the “My CDash” page to see the link that will let you create a new project:

The next page will open the project creation process. At this point, the only information that is required is a name for the project but more fields can be filled in to take advantage of the features of CDash.
By clicking the arrow at the bottom to move through the pages, you can enter information until you reach the Miscellaneous page and the final “Create Project” button. After clicking that button, you will be moved to a page with some helpful links.
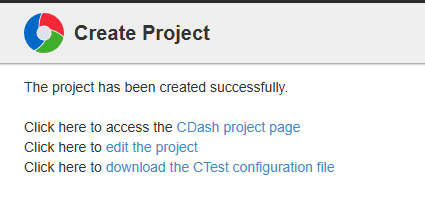
The first is to allow you to navigate to the project page, which will be empty so far. The second would allow you to edit the project that was just created. The last link on the page will allow you to “download the CTest configuration file”. Right click on the link, and save a copy of the file to the source directory of your repository.
The example’s CTestConfig.cmake file is captured in the text below. If you don’t have access to the CTestConfig file, this information could be copied and altered to match the desired information for their project.
--- Current folder structure ----
py_example
  \
   | - py_square.py
   | - CMakeLists.txt
   | - CTestConfig.cmake   <--- New
And the content of that file should be the following:
# This file should be placed in the root directory of your project.
## Then modify the CMakeLists.txt file in the root directory of your
## project to incorporate the testing dashboard.
##
## # The following are required to submit to the CDash dashboard:
##   ENABLE_TESTING()
##   INCLUDE(CTest)

set(CTEST_PROJECT_NAME simpleExample)
set(CTEST_NIGHTLY_START_TIME 01:00:00 UTC)

if(CMAKE_VERSION VERSION_GREATER 3.14)
  set(CTEST_SUBMIT_URL https://my.cdash.org/submit.php?project=simpleExample)
else()
  set(CTEST_DROP_METHOD "https")
  set(CTEST_DROP_SITE "my.cdash.org")
  set(CTEST_DROP_LOCATION "/submit.php?project=simpleExample")
endif()

set(CTEST_DROP_SITE_CDASH TRUE)
Running CMake
Now that the source code files are in place, we’ll go through the CMake process to “Configure” and “Generate” to generate the files needed for CTest to fully describe each of the tests set up in the commands. This is accomplished by either using the CMake command line or an instance of the CMake GUI. As the LANGUAGE for the project has been set to NONE, we don’t need to worry about the selection of a Generator, as no compiler checks are going to be performed. It’s safe to use the default for your operating system that CMake chooses for you.
Here we’ll create a build directory within our py_example folder and give CMake the path to the parent folder to process.
--- Current folder structure ----
py_example
  \
   | - py_square.py
   | - CMakeLists.txt
   | - CTestConfig.cmake
   | build    <--- New
~/py_example/build$ cmake ..
-- Found Python3: /usr/bin/python3 (found version "3.12.3") found components: Interpreter
-- Configuring done (0.3s)
-- Generating done (0.0s)
-- Build files have been written to: <...>/py_example/build
~/py_example/build$
Running CTest
Now that the build directory is populated, we can execute the CTest executable with the instructions to submit the information to the CDash described in the CTestConfig.cmake file. The simplest form of this would be to use the -D <Mode> argument to the ctest executable. If we use this argument with the <Mode>, CTest will execute a standard set of steps which will finish with the submitting of the information to CDash. The <Mode> value should be set to one of the following strings:
- Experimental
- Used for testing local modifications
- Can be submitted multiple times with entries for each submission
- Nightly
- Used for testing a repository on a regular basis
- One entry per day, overwriting the previous entry if submitted again
- Performs “Update” step to pull latest changes in local repository before proceeding through process
- Continuous
- Used for testing a repository on a constant or regular basis
- Performs update step to pull latest changes in local repository, it does not proceed to build and test if no updates were found
For more information about each mode and the steps that are executed with each call, see the documentation here: CTest Modes
An example of this type of execution can be seen here:
$ ctest -D Experimental
   Site: irune-vm-cdash2
   Build name: Linux-unknown
Create new tag: 20250626-1946 - Experimental
Configure project
   Each . represents 1024 bytes of output
    . Size of output: 0K
Build project
   Each symbol represents 1024 bytes of output.
   '!' represents an error and '*' a warning.
     Size of output: 0K
   0 Compiler errors
   0 Compiler warnings
Test project <...>/py_example/build
    Start 1: help_test
1/6 Test #1: help_test ........................   Passed    0.04 sec
    Start 2: 5_test
2/6 Test #2: 5_test ...........................   Passed    0.04 sec
    Start 3: fail_test
3/6 Test #3: fail_test ........................   Passed    0.04 sec
    Start 4: test_answer2
4/6 Test #4: test_answer2 .....................   Passed    0.22 sec
    Start 5: test_answer3
5/6 Test #5: test_answer3 .....................***Failed  Error regular expression found in output. Regex=[FAILED]  0.23 sec
    Start 6: test_answer4
6/6 Test #6: test_answer4 .....................   Passed    0.22 sec

83% tests passed, 1 tests failed out of 6

Total Test time (real) =   0.79 sec

The following tests FAILED:
	  5 - test_answer3 (Failed)
Performing coverage
 Cannot find any coverage files. Ignoring Coverage request.
Submit files
   SubmitURL: https://my.cdash.org/submit.php?project=simpleExample
   Uploaded:  <...>/py_example/build/Testing/20250626-1946/Configure.xml
   Uploaded:  <...>/py_example/build/Testing/20250626-1946/Build.xml
   Uploaded:  <...>/py_example/build/Testing/20250626-1946/Test.xml
   Uploaded:  <...>/py_example/build/Testing/20250626-1946/Done.xml
   Submission successful
Errors while running CTest
Output from these tests are in:  <...>/py_example/build/Testing/Temporary/LastTest.log
Use "--rerun-failed --output-on-failure" to re-run the failed cases verbosely.
CTest Driver
The more advanced way of submitting to a CDash is with a CTest script. This allows you to have direct control over the type and order of execution steps that CTest will perform when it is executed. This file consists of variables and commands to execute each of the steps of the testing process. Much like the manual process, the binary and source directories will need to be available as a variable in addition to the Generator that will be used for the CMake process.
For information about the different steps available and the arguments that can be used to change how the step is executed, see the CTest documentation for the Dashboard Client Steps.
--- Current folder structure ----
py_example
  \
   | - py_square.py
   | - CMakeLists.txt
   | - CTestScript.cmake   <--- New
   | - CTestConfig.cmake
   | build
   \
    | - CMakeCache.txt
    <.....>
The simplest version of this file would look something like below:
cmake_host_system_information(RESULT HOST_NAME QUERY HOSTNAME)

set( CTEST_SITE ${HOST_NAME})
set(CTEST_BUILD_NAME "pyexample_build")
set( CTEST_SOURCE_DIRECTORY "${CMAKE_CURRENT_LIST_DIR}" )
set( CTEST_BINARY_DIRECTORY "${CMAKE_CURRENT_LIST_DIR}/build")
set(CTEST_CMAKE_GENERATOR "Unix Makefiles")

# Optionally, set files to upload as "NOTES" for the build
set(CTEST_NOTES_FILES "${CTEST_SOURCE_DIRECTORY}/CMakeLists.txt")

# ctest_start will take the name of the mode like the
# -D command does
ctest_start("Experimental")

# Attempt to pull updates from version control
ctest_update()

# Executes the Configure/Generate step
ctest_configure(
    BUILD   ${CTEST_BINARY_DIRECTORY}
    SOURCE  ${CTEST_SOURCE_DIRECTORY}
)
# Executing  ctest command
ctest_test()

# Submit Files to CDash
ctest_submit()
More advanced usage of these commands might submit the XML files in multiple parts or take advantage of the commands for ctest_coverage() or ctest_memcheck() to perform dynamic analyses.
A run of this file with extra verbosity, to allow us to see each step occur, would look like the following:
~/py_example/build$ ctest -S ../CTestScript.cmake -V
Run dashboard with model Experimental
   Source directory: <...>/py_example
   Build directory: <...>/py_example/build
   Reading ctest configuration file: <...>/py_example/CTestConfig.cmake
   Site: irune-vm-cdash2
   Build name: pyexample_build
   Use Experimental tag: 20250905-1418
   Updating the repository: <...>/py_example
Cannot find UpdateCommand or GITCommand configuration key.
Configure project
   Each . represents 1024 bytes of output
    . Size of output: 0K
Test project <...>/py_example/build
    Start 1: help_test
1/5 Test #1: help_test ........................   Passed    0.06 sec
    Start 2: 5_test
2/5 Test #2: 5_test ...........................   Passed    0.05 sec
    Start 3: fail_test
3/5 Test #3: fail_test ........................   Passed    0.04 sec
    Start 4: test_answer2
4/5 Test #4: test_answer2 .....................   Passed    0.25 sec
    Start 5: test_answer3
5/5 Test #5: test_answer3 .....................***Failed  Error regular expression found in output. Regex=[FAILED]  0.26 sec

80% tests passed, 1 tests failed out of 5

Total Test time (real) =   0.67 sec

The following tests FAILED:
	  5 - test_answer3 (Failed)
	Add file: <...>/py_example/CMakeLists.txt
Submit files
   SubmitURL: http://<...>/submit.php?project=simpleExample
   Uploaded: <...>/py_example/build/Testing/20250905-1418/Configure.xml
   Uploaded: <...>/py_example/build/Testing/20250905-1418/Test.xml
   Uploaded: <...>/py_example/build/Testing/20250905-1418/Notes.xml
   Uploaded: <...>/py_example/build/Testing/20250905-1418/Done.xml
   Submission successful
Browse Results
If the files were submitted successfully, you can browse to the CDash instance and examine the information and test results generated by CTest. An individual build’s page might look something like this:

From here, as more submissions are made and history is built for your project, you can begin to see the ebb and flow of your development. CDash will take advantage of this wealth of information to show users the trend of the testing and highlight potential issues as timing or other metrics change over time.
For the full example of the files and commands that were used in this blog post, see the repository here.
what does ctest_start(“Experimental”) do in the example? Why not “Continuous”? How to configure both “Experimental” and “Continuous” modes?
I want to run unit tests non-stop locally whenever source files get updated, without uploading to a CDash. How to do that?
Hi Alex
“Experimental” indicates the Dashboard type. This sometimes tells CTest what kind of steps to run but we’re using it to indicate what section of the dashboard that the results would be able to be found under.
If you wanted to have one CTest script that allows for multiple types of Dashboard submissions, you could replace the string with a variable and then define the variable on the command line:
ctest_start("Experimental")becomesctest_start($DASHBOARD_TYPE)And then you’d be able to call CTest and define that variable:
ctest -D DASHBOARD_TYPE=Continuous -S ../CTestScript.cmakeAs for the second half of your question, you’d likely need to find a different program to watch your source repository for changes. CTest doesn’t have the monitoring capabilities to perform what you’re asking for.
Thanks!