Developing custom 3D medical image segmentation solutions using out-of-the-box pipelines in MONAI
Introduction
Semantic image segmentation involves identification and labeling of distinct anatomical regions of interest in an image, and is a critical step in many medical image analysis applications. Current approaches for image segmentation largely rely on rapidly evolving methods and algorithms based on deep convolutional networks. Typically, given a medical imaging dataset and segmentation task, a tailored solution, which includes design choices such as network architecture, loss function and training hyperparameters, is manually designed and optimized based on the properties of the dataset and the hardware being used. However, due to the numerous choices and dataset properties that need to be considered, this process can be a time consuming trial and error process and achieve varying degrees of success depending on the skill and experience of the experimenter.
To address this, in recent years, researchers have developed out-of-the-box image segmentation pipelines that provide a standardized, data-set agnostic recipe for method development, thus bridging the gap between practical application and innovation. These pipelines serve as state-of-the-art baselines that can be further fine-tuned or modified for specific segmentation tasks.
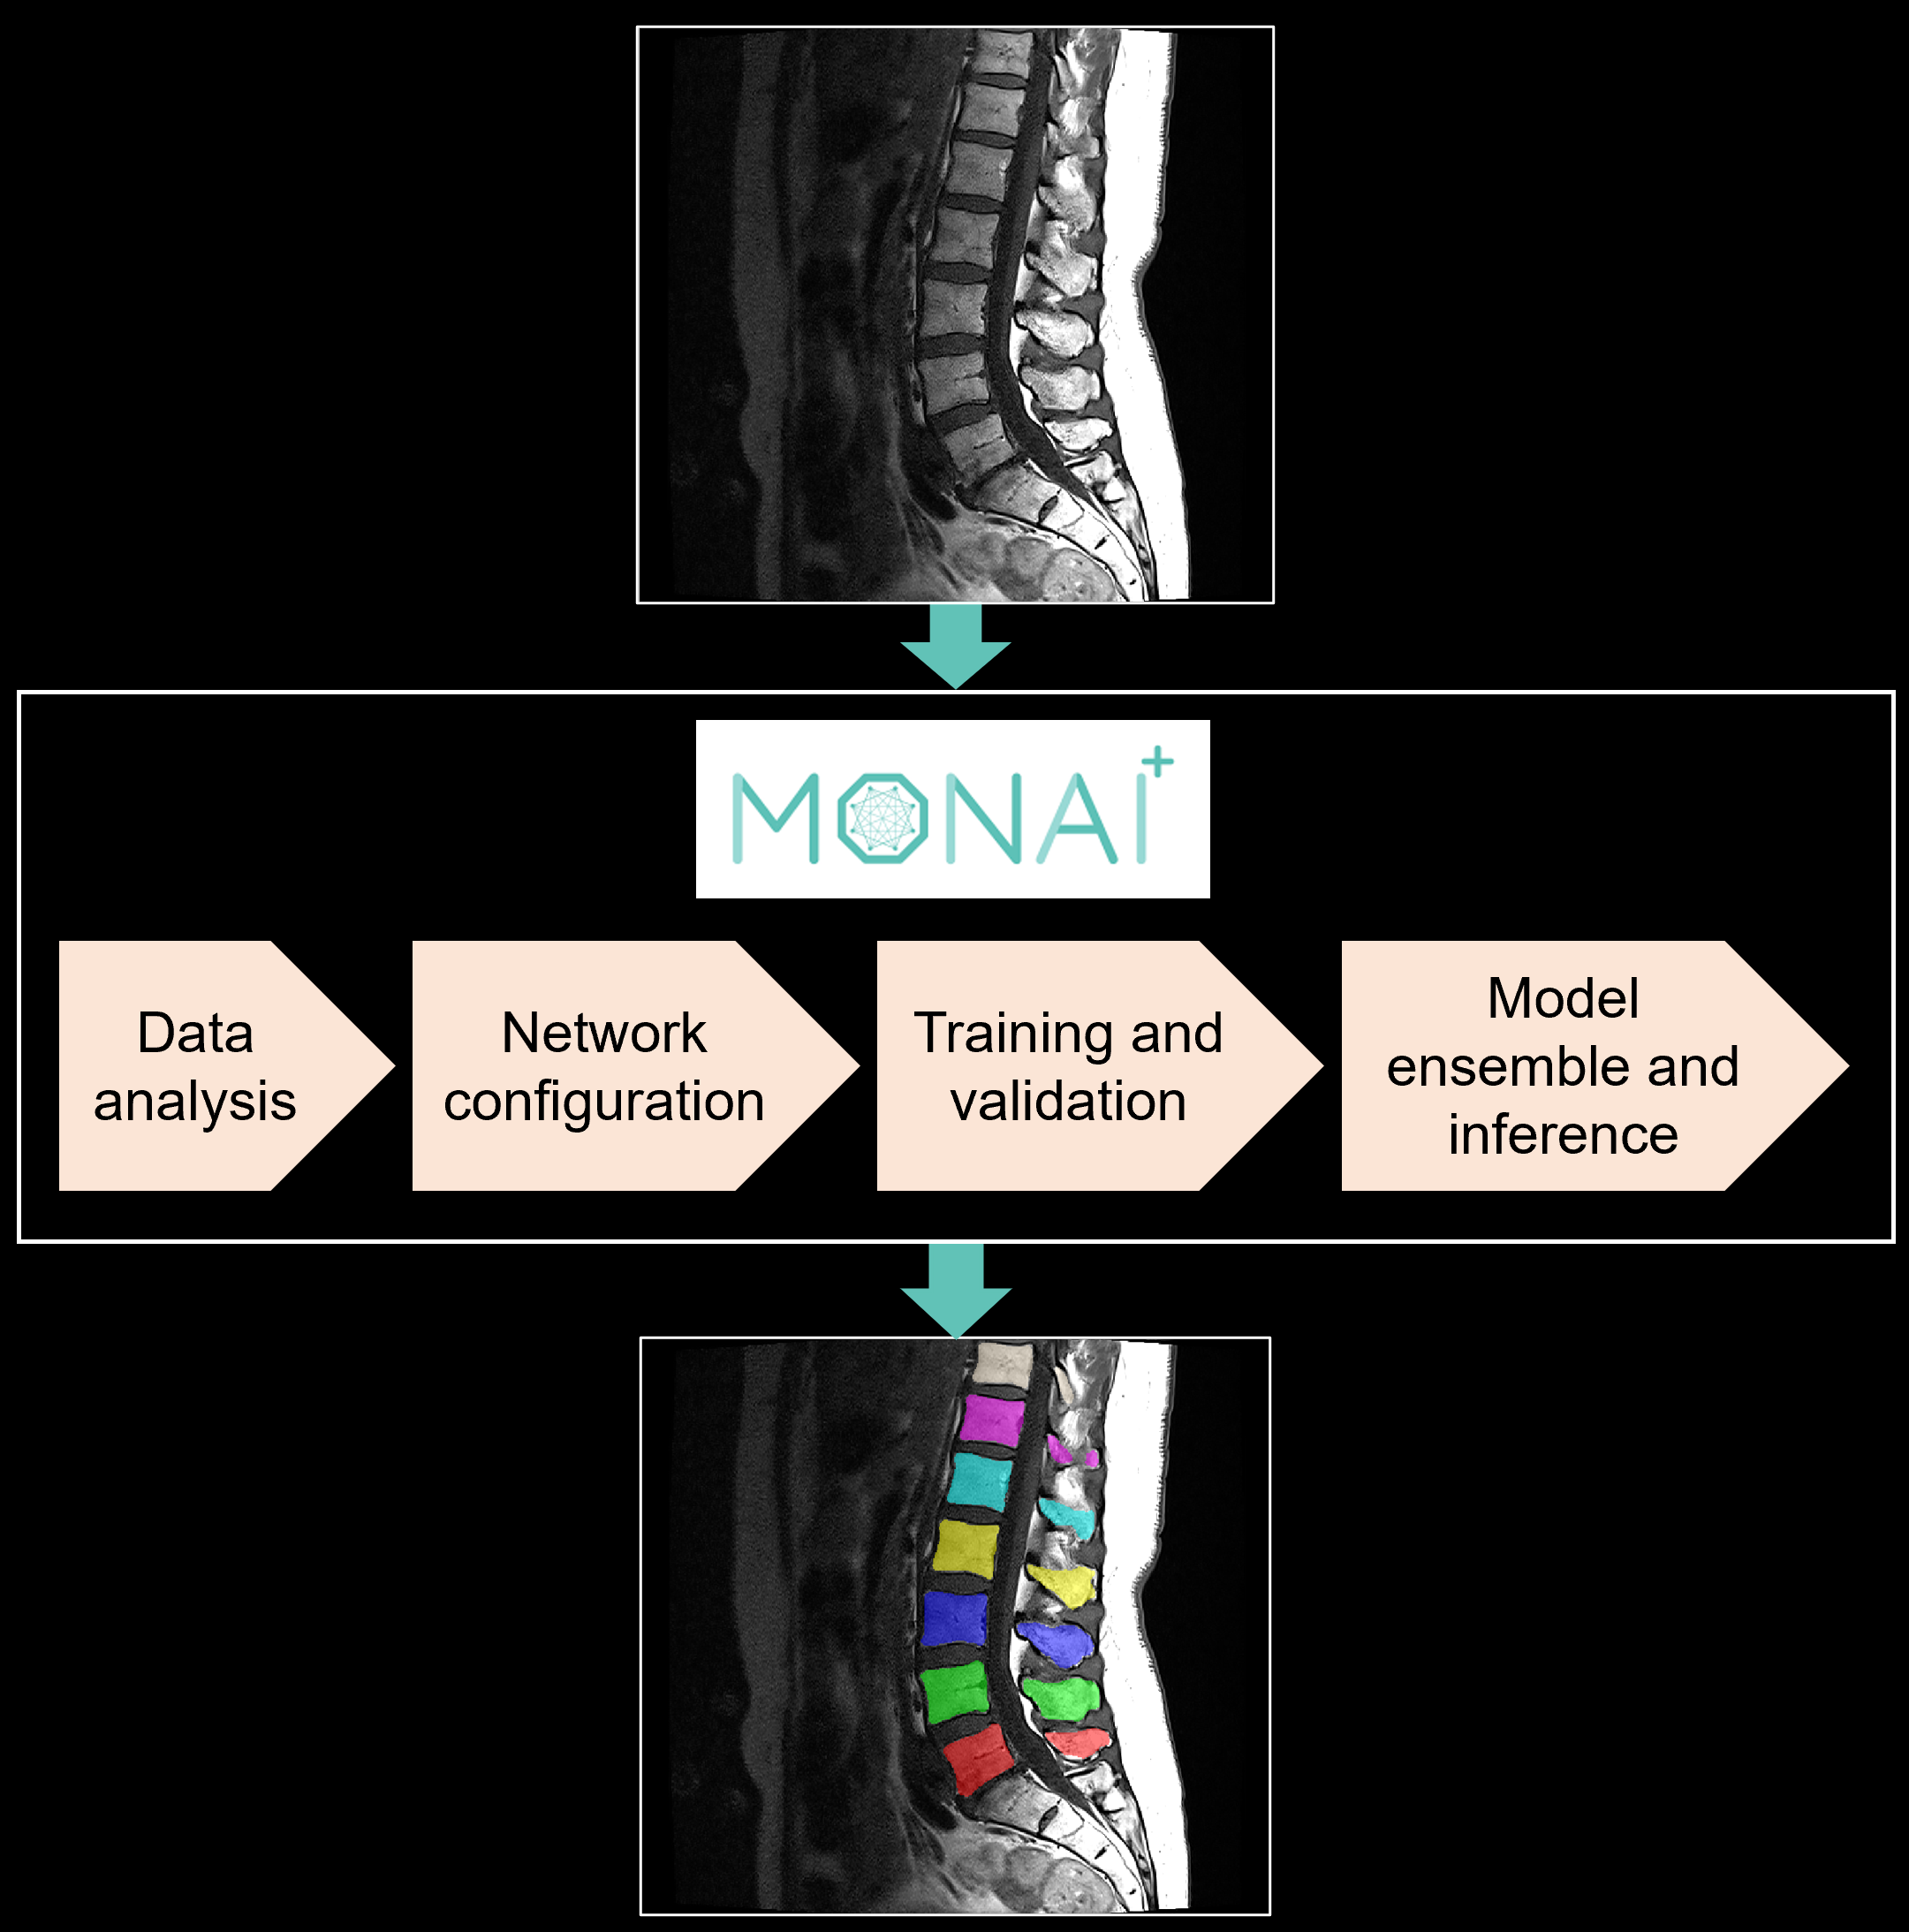
In this blog, we share our experience using two such automated, supervised segmentation pipelines: nnU-Net and Auto3DSeg in the context of segmenting individual vertebrae in T1 MRI scans of the lumbar spine (SPIDER grand challenge dataset). Both pipelines can be implemented within the open-source MONAI framework for healthcare imaging with minimal user input to run training and inference on any medical dataset for segmentation. In addition to providing an overview of these pipelines, we share our insight on how these tools can be customized and optimized for specific tasks.
nnU-Net
Overview
“nnU-Net” (“No New U-Net”) is an open-source segmentation tool that automatically self-configures a U-Net based pipeline, including preprocessing, network architecture, training and post-processing based on the properties derived from the training dataset [1]. The U-Net architecture is the most commonly used benchmark in medical image segmentation tasks due to its flexibility and great success in numerous biomedical domains. nnU-Net aims to squeeze out the U-Net architecture’s full potential using a set of carefully designed optimization strategies, thus providing a standardized baseline framework that can be built upon by developers. Upon release in December 2020, nnU-Net was evaluated on 23 datasets belonging to competitions from the biomedical domain and scored several first places on open leaderboards. Since then, the framework has served as the baseline and method development framework for several of the challenge winners at MICCAI 2020 and MICCAI 2021.
How it works
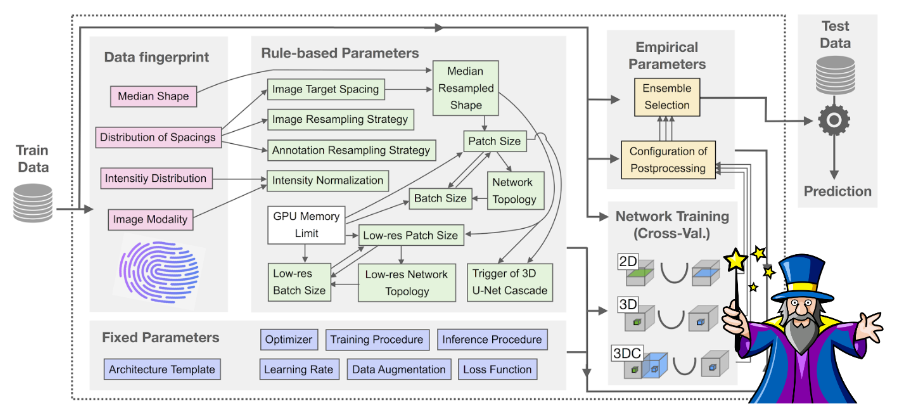
The nnU-Net pipeline considers three basic U-Net architectures: a 2D U-Net, a 3D U-Net and a U-Net cascade (a 3D U-Net first operates on a low resolution image and then a second high resolution 3D U-Net refines the initial predictions), and can handle both 2D and 3D images. Given a new dataset, nnU-Net systematically analyzes the training cases and creates a ‘dataset fingerprint’ that includes information such as image shape, spacing and intensity distribution. Based on the extracted dataset properties, nnU-Net configures the optimal segmentation pipeline for each of the U-Net architectures following a three step recipe consisting of 1) fixed parameters such as the loss function, data augmentation strategies and learning rate, which are robust configurations that can be used across all tasks and datasets; 2) rule-based parameters such as the network topology, input patch size and normalization strategy, which are determined based on the properties of the dataset in accordance with hard-coded heuristic rules, and 3) empirical parameters, which are determined using trial and error, and include selection of the best U-Net architecture and post-processing strategy following network training. Additionally, when configuring the network topology and input patch and batch size, nnU-Net automatically takes into account the available GPU memory as an additional constraint for optimizing the pipeline.
Running the pipeline within the MONAI framework
To get started, nnU-Net expects the input dataset to be in a structured format inspired by the Medical Segmentation Decathlon data structure. Given a dataset, nnU-Net covers the entire pipeline, from preprocessing to model configuration, cross-validated model training, post-processing all the way to ensembling. After running nnU-Net, the trained model(s) can be applied to the test cases for inference.
The pipeline can be implemented directly using the python APIs provided in the project GitHub or using the nnU-Net integration available within the MONAI framework using the class nnUNetV2Runner. Here we focus on implementing the pipeline within the MONAI framework, which allows users to easily take advantage of the comprehensive set of image analysis tools available within MONAI, and has the useful feature of automating dataset conversion to meet the requirements of nnU-Net for users already working within the MONAI ecosystem.
To run nnUnetV2Runner, the user first needs to create a data list (“.json” file) for the new task, which provides the correspondence between input images and ground truth label files. The user then provides a simple input configuration list (“.yaml” file) as the minimum input for nnUNetV2Runner, specifying the root directory containing the data, input modality and datalist filename. The code below shows an example input configuration:
# Create input configuration .yaml file. Can specify optional nnU-Net directories
input_config = {
    "name": "LumbarSpineSeg", # optional, it is only for your own record
    "task": "segmentation",  # optional, it is only for your own record
    "modality": "MRI",  # required
    "datalist": "spineseg_datalist.json",  # required
    "dataroot": dataroot_dir,  # required
    "nnunet_raw":"./nnUNet_raw_data_base",  # directory for storing formatted raw data (optional),
    "nnunet_preprocessed": "./nnUNet_preprocessed", # directory for storing pre-processed data (optional),
    "nnunet_results": "./nnUNet_trained_models", # directory for storing trained model checkpoints (optional)
    "dataset_name_or_id": 200 # Name or integer id
}

input_yaml = "input_nnunet.yaml"
ConfigParser.export_config_file(input_config,input_yaml)
The entire pipeline can then be run using the following input bash command:
# Run default training pipeline
python -m monai.apps.nnunet nnUNetV2Runner run --input_config "./input_nnunet.yaml"
The above command runs all components of the nnU-Net pipeline including dataset fingerprint extraction, planning, preprocessing, training and ensembling. Alternatively, the user can run individual components within the pipeline and define specific training configurations such as an individual training fold, a specific network configuration or a custom trainer class with a shorter training length, as shown in these example bash commands:
# Convert dataset
python -m monai.apps.nnunet nnUNetV2Runner convert_dataset --input_config "./input_nnunet.yaml"

# Plan and preprocess
python -m monai.apps.nnunet nnUNetV2Runner plan_and_process --input_config "./input_nnunet.yaml" \
--verify_dataset_integrity True

# Run training and specify nnU-Net training configurations
python -m monai.apps.nnunet nnUNetV2Runner train_single_model --input_config "./input_nnunet.yaml" \
    --config "3d_fullres" \
    --fold 0 \
    --gpu_id 0 \
    --trainer_class_name "nnUNetTrainer_250epochs" \
    --export_validation_probabilities True
How to customize nnU-Net for specific tasks
Since its release, many researchers have been using nnU-Net as a baseline framework to develop new and innovative medical imaging applications. For example, in the SPIDER grand challenge dataset used in this blog, the authors provide reference performance values obtained using nnU-Net as a benchmark to improve upon during the challenge.
With the recent release of nnUnetV2 in early 2023, customization or extension of the nnU-Net framework for specific applications has become much simpler. Through the ‘plans file’ generated during the planning and preprocessing step, changes can be made to the network topology and configuration, preprocessing strategy and resampling strategy without any code extensions. For example, in a recent publication focused on segmenting tumor lesions in CT and PET scans (AutoPET II challenge), the authors behind nnU-Net modified the pipeline by increasing the batch size and patch size, and switching to a U-Net with residual encoders, using only the “nnUNetPlans.json” file, and obtained a configuration that significantly outperformed the baseline network [3].
Modifications can also be made to the network architecture and training procedure such as changing the loss function, data augmentation strategies, data loader and training length. However, such customizations require creating a custom trainer class which implements the necessary changes to overwrite the default functions. As an example of a network modification, in [4], Zhang et al. built upon an nnU-Net backbone by introducing a conditioning strategy which inputs additional prior information in the decoder of the network to improve multi-organ segmentation performance when dealing with partially labeled datasets. Overall, the potential modifications to nnU-Net are endless and while the pipeline is easy to understand due to use of the more straightforward U-Net architecture, more advanced customizations involving code extensions require taking some time to understand the structure of the code base before implementing the necessary modifications.
Auto3DSeg
Overview
Auto3DSeg is a MONAI native project that provides recipes of best practices for developing and deploying segmentation algorithms, while leveraging the advanced image analysis tools available in MONAI. The pipeline can be run as a self-contained 3D medical image segmentation solution with minimal user input, or using the individual components provided through Auto3DSeg’s flexible and modular design. Unlike nnU-Net which only considers U-Net based architectures, Auto3DSeg supports four different algorithms: 2D/3D SegResNet, DiNTS and SwinUNETR, and provides the best configuration and training recipe for each network based on the given input dataset. Auto3DSeg was evaluated in several MICCAI 2022 challenges and won 1st place in terms of Dice score in Hektor22, INSTANCE22 and ISLE22.
How it works
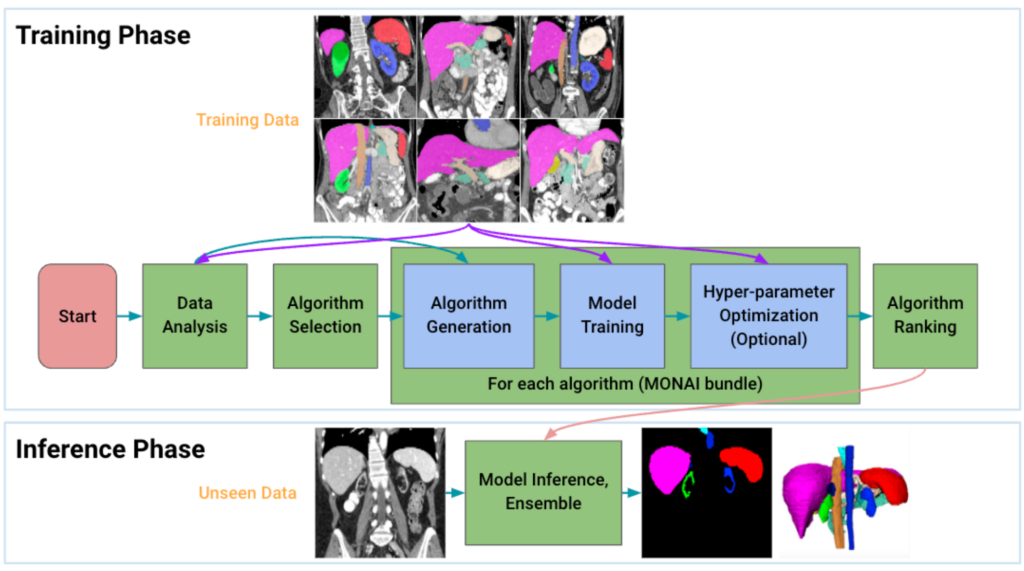
Given an input dataset, Auto3DSeg first analyzes the global information of the training images such as intensity, data size, and data spacing, and then generates self-contained algorithm folders in MONAI bundle format based on the dataset properties and pre-specified algorithm templates. Each of the algorithms is then trained following 5-fold cross-validation to obtain model checkpoints with the best validation accuracy in each fold. Finally, the ensemble module selects the top algorithms by ranking the trained checkpoints in each fold and creates ensemble predictions on the inference dataset. Additionally, when running the pipeline, Auto3DSeg automatically scales to use all available GPUs and also supports multi-node training. Auto3DSeg also supports hyperparameter optimization through third-party packages such as Microsoft Neural Network Intelligence (NNI) and Optuna.
Running the pipeline
Auto3DSeg includes several python APIs that can be used to run the pipeline at different levels of complexity. Similar to the input configuration format required to run the nnUNetV2Runner class, the user needs to provide a “.yaml” input configuration file that defines the root directory containing the data, input modality and datalist:
# Create input configuration .yaml file.
input_config = {
    "name": "LumbarSpineSeg", # optional, it is only for your own record
    "task": "segmentation",  # optional, it is only for your own record
    "modality": "MRI",  # required
    "datalist": "spineseg_datalist.json",  # required
    "dataroot": dataroot_dir,  # required
}

input_yaml = "input_auto3dseg.yaml"
ConfigParser.export_config_file(input_config,input_yaml)
The entire pipeline can then be run using the AutoRunner class, that implements all the underlying components of Auto3DSeg including data analysis, algorithm generation, 5-fold cross-validated training of the different network configurations and model ensemble:
# Run pipeline with minimal input
runner = AutoRunner(
    work_dir= "./auto3dseg",
    input = input_config
)
runner.run()
Alternatively, the user can run specific components within the pipeline:
# Run data analyzer
analyser = DataAnalyzer(datalist_file, dataroot_dir)
datastat = analyser.get_all_case_stats()
# Generate algorithm templates
bundle_generator = BundleGen(
algo_path="./auto3dseg",
data_stats_filename= os.path.join("./auto3dseg","datastats.yaml"),
data_src_cfg_name=input,
algos = "swinunetr"
) # can specify specific algorithm
bundle_generator.generate("./auto3dseg", num_fold=5)
# Run training
runner = AutoRunner(
work_dir= "auto3dseg",
input = input_config,
analyze = False
)
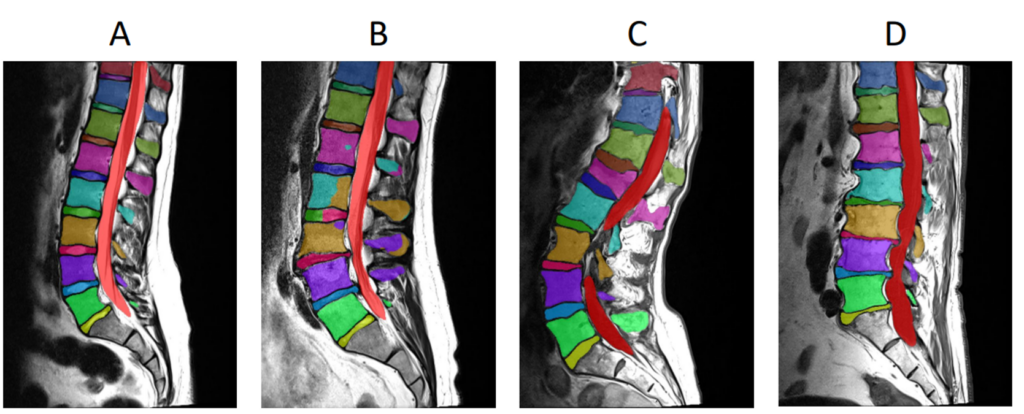
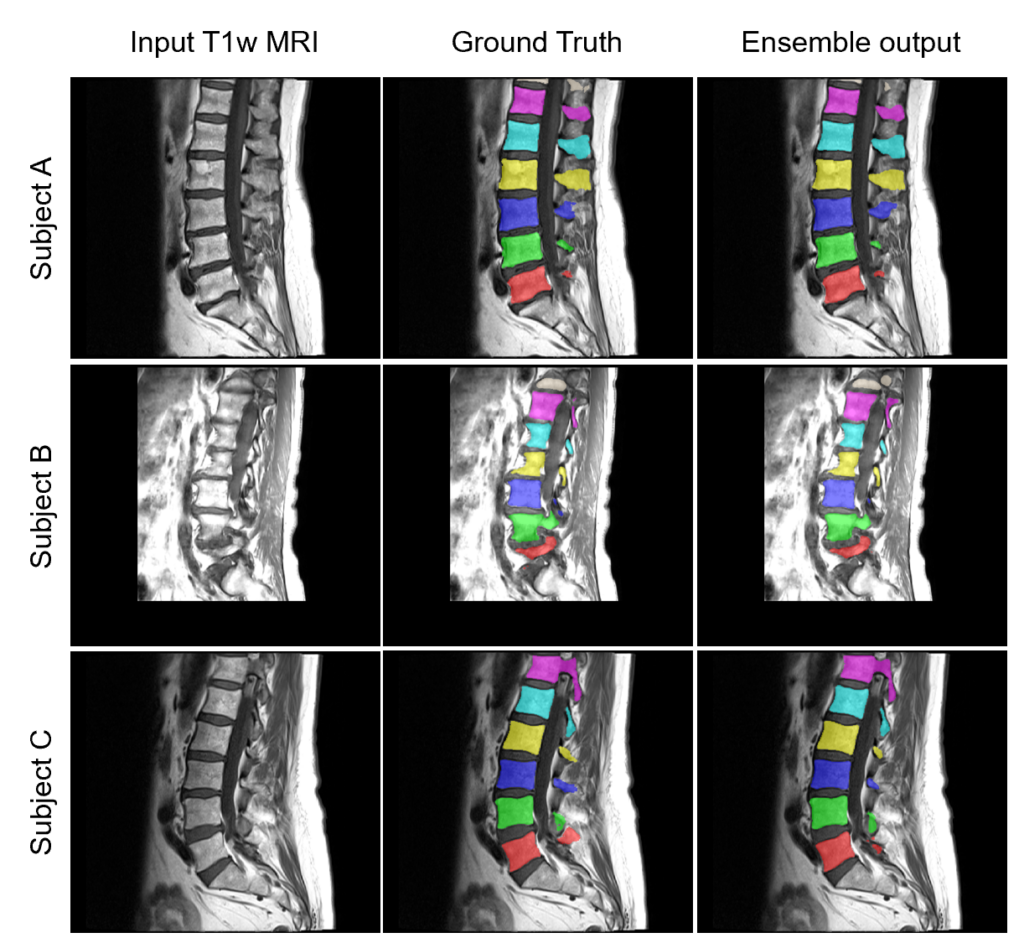
runner.run()Here are some example ensemble output predictions obtained after training the Auto3DSeg pipeline on T1w MRI of lumbar vertebrae:
How to customize Auto3DSeg for specific tasks
Users can customize various aspects of the Auto3DSeg pipeline by configuring the internal parameters of the AutoRunner class. Customizations can be made to training parameters, the ensembling method and inference parameters as shown in the code below:
#Set custom training parameters
max_epochs = 2
train_param = {
    "num_epochs_per_validation": 1,
    "num_images_per_batch": 2,
    "num_epochs": max_epochs,
    "num_warmup_epochs": 1,
    "num_images_per_batch": 2,
    "patch_size_valid":[48,64,64]
}

runner = AutoRunner(input=input)
runner.set_training_params(params=train_param)

# Set model ensemble method
runner.set_ensemble_method(ensemble_method_name="AlgoEnsembleBestByFold")

# Set custom inference parameters
pred_params = {
    "mode": "vote",  # use majority vote instead of mean to ensemble the predictions
    "sigmoid": True,  # when to use sigmoid to binarize the prediction and output the label
}

runner.set_prediction_params(params=pred_params)
runner.run()
Auto3DSeg also allows customization of the data analysis and ensembling pipelines through the definition of new ‘Analyzer’ and ‘AlgoEnsemble’ classes respectively, that overwrite or build on the default modules. Users can also write new algorithm templates to train models beyond the three approaches (SegResNet, SwinUNETR, DiNTS) included by default within the pipeline.
Conclusions
In this post, we discuss two state-of-the-art image segmentation pipelines which provide researchers and developers standardized recipes for method development. If looking to develop custom medical image segmentation pipelines for a specific task, using these pipelines as a baseline upon which to innovate allows for increased reproducibility, consistency and transparency within the research community. Moreover, the integration of both Auto3DSeg and nnU-Net within the MONAI framework allows developers to easily implement and evaluate both pipelines on any given segmentation task.
Collaborating with Kitware on your segmentation projects
Kitware is actively involved in various projects in the MONAI ecosystem. We can apply our domain expertise and experience working with nnU-Net and Auto3DSeg to help you integrate the power of MONAI into your healthcare medical imaging solutions. Contact our team for more information.
References
[1] Isensee, Fabian, et al. “nnU-Net: a self-configuring method for deep learning-based biomedical image segmentation.” Nature methods 18.2 (2021): 203-211.
[2] van der Graaf, Jasper W., et al. “Lumbar spine segmentation in MR images: a dataset and a public benchmark.” arXiv preprint arXiv:2306.12217 (2023).
[3] Isensee, Fabian, and Klaus H. Maier-Hein. “Look Ma, no code: fine tuning nnU-Net for the AutoPET II challenge by only adjusting its JSON plans.” arXiv preprint arXiv:2309.13747 (2023).
[4] Zhang, Guobin, et al. “Multiorgan segmentation from partially labeled datasets with conditional nnU-Net.” Computers in Biology and Medicine 136 (2021): 104658.
[5] https://github.com/Project-MONAI/tutorials/tree/main/auto3dseg