Improved VES/KiwiViewer build with Eclipse and CMake on Linux, Mac, and Windows

** This is the continuation (or improved version) of our previous post on this topic: http://www.kitware.com/blog/home/post/546.
Introduction
VES (http://ves.vtk.org) is VTK for Embedded Systems. It is a C++ rendering library for mobile devices using OpenGL ES 2.0. VES integrates with the Visualization Toolkit (VTK) to deliver:
- Scientific and medical visualization capabilities
- Remote rendering and/or data hosting
- Modern/novel/new/collaborative interaction techniques
Recently, we made improvements to building VES (specifically KiwiViewer) for Android on Linux and Mac and Windows using CMake and Eclipse. The build procedure requires Android NDK, Android SDK, and Java JDK to be installed on the system. VES includes an example application called KiwiViewer. This blog will describe how to build VES, and then build KiwiViewer. The blog will also cover how to install and setup the correct Android development environment.
Installing the development environment
Download and install the Android SDK from here: http://developer.android.com/sdk/index.html. For Windows, you should download and install the ADT Bundle for Windows (a .zip file). There is no executable installer. You will just have to unzip this into a directory. For this example, the file is unzipped o C:/Users/hoffman/android-windows. Also, download and install the NDF from here: http://developer.android.com/tools/sdk/ndk/index.html.
You will also need Java JDK as well. In our setup, it is installed here: c:/Program\ Files\ \(x86\)/Java/. Below are the steps for building VES.
1. Get a copy of VES
> git clone git://vtk.org/stage/VES.git
> git checkout master
2. Open a VS Command Prompt and then type following commands.
> set ANDROID_NDK=c:\Users\hoffman\android-windows\android-ndk-r9
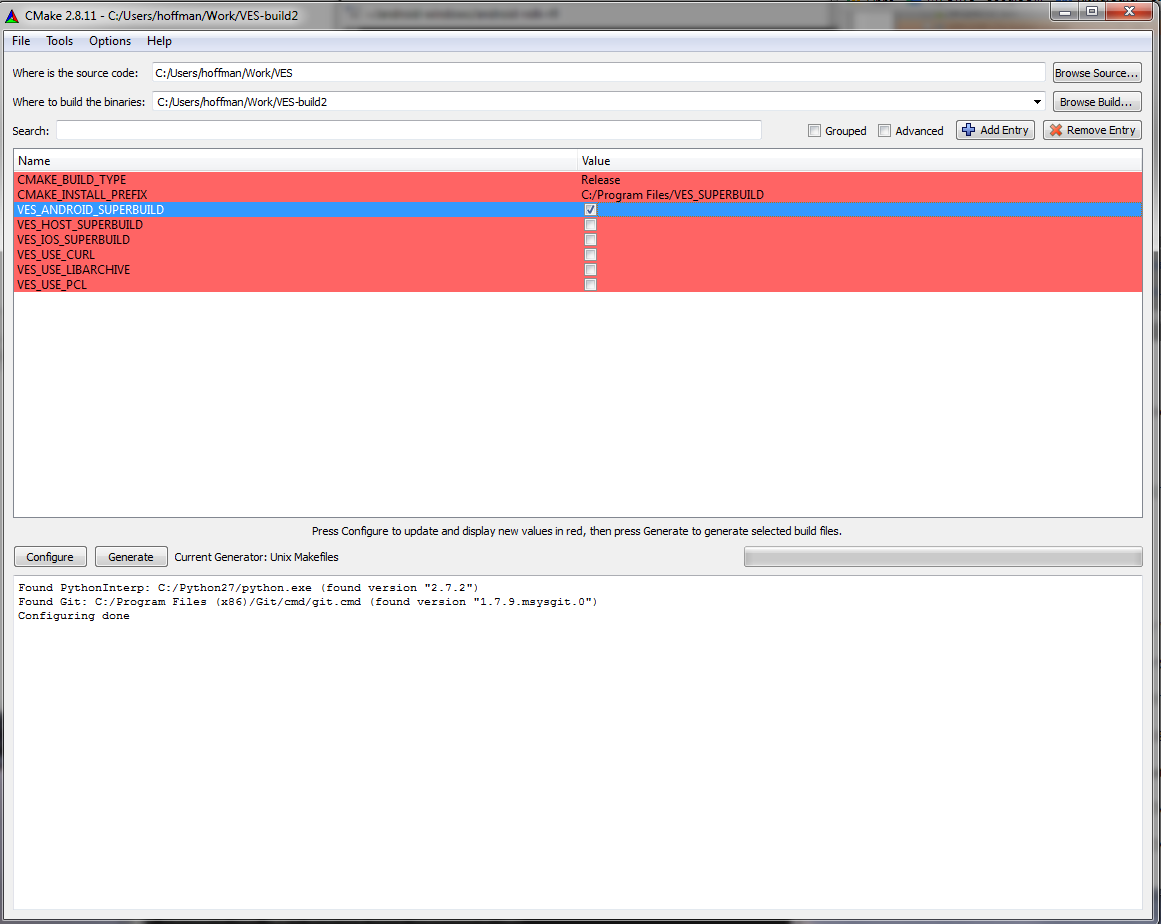
3. Run cmake-gui from command line.
> “\Program Files (x86)\CMake 2.8\bin\cmake-gui.exe”
4. Turn on VES_ANDROID_SUPERBUILD
5. Run jom in build directory or nmake if you want to wait. 🙂
> cd ‘build dir from above’
> \Users\hoffman\jom\jom.exe
6. Build Kiwi.
Run cmake-gui on Kiwi, be sure to use toolchain option.
> CMAKE_TOOLCHAIN_FILE:FILEPATH=C:/Users/hoffman/Work/VES/CMake/toolchains/android.toolchain.cmake
7. Use the cache it creates.
> c:\Users\hoffman\Work\VES4\VES-build\Apps\KiwiAndroid>”\Program Files (x86)\CMake 2.8\bin\cmake-gui.exe” ..\..\..\VES\Apps\Android\Kiwi ANDROID_EXECUTABLE:FILEPATH=C:/Users/hoffman/android-windows/adt-bundle-windows-x86_64-20130917/sdk/tools/android.bat ANT_EXECUTABLE:FILEPATH=C:/Users/hoffman/android-windows/adt-bundle-windows-x86_64-20130917/eclipse/plugins/org.apache.ant_1.8.3.v201301120609/bin/ant.bat
You will have to set VTK_DIR and VES_DIR appropriately. Set it to the VES and VTK build directories created by the superbuild.
8. Put javac in the PATH and set JAVA_HOME
> set PATH=%PATH%;c:\Program Files (x86)\Java\jdk1.7.0_03/bin
> set JAVA_HOME=c:\Program Files (x86)\Java\jdk1.7.0_03
9. Prevent java from running out of memory during compile.
> set _JAVA_OPTIONS=”-Xmx256M”
11. Run nmake or jom in build tree and then run eclipse from the command line
> \Users\hoffman\eclipse\eclipse\eclipse.exe
That’s all to it. AndroidManifest.xml is only done at configure time, this needs to be moved to build time, so that clean works. On Ubuntu you will need 32 bit libs: http://developer.android.com/sdk/installing/index.html. If you need help installing and configuring Java on your development machine, you might find these resources helpful:
https://help.ubuntu.com/community/Java
https://help.ubuntu.com/community/JavaInstallation
Here are the steps to install Java and Eclipse, prior to installing the Android SDK and ADT Plugin. If you are running a 64-bit distribution on your development machine, you need to install the ia32-libs package using apt-get:
> apt-get install ia32-libs
Next, install Java.
> apt-get install sun-java6-jdk
The Ubuntu package manager does not currently offer an Eclipse 3.6 version for download, so we recommend that you download Eclipse from eclipse.org (http://www.eclipse.org/ downloads/). A Java or RCP version of Eclipse is recommended. Follow the steps given in previous sections to install the SDK and the ADT plugin. Information for other platforms.
What about building the project using Gradle and Android Studio? Ditching cmake for gradle seems like the right way to go.
I’d love to a tutorial (or some resources) for Android Studio integration
You can get the project into Android Studio and organize it like a modern Android project. The real issue is that that NDK compilation process is still tied to cmake and not gradle. This means that every time you need to edit the C++ based portion of the code you’re back to the command-line which doesn’t make for a great workflow. Grade is making great progress in terms of compiling C++/C and the NDK is becoming a bit more of a first-class citizen every day.
You might be interested in the work I did to get this compiling using ndk-build so that you debug normally. This could be pulled into Eclipse today and when Android Studio supports C++ you can import it there.
https://github.com/palmerc/VES-Kiwi-NDK
Hello Cameron,
Currently starting to try and use VTK for android. Would love to know how advanced you with VTK for android. I would love to get at least one working example on eclipse/Android Studio. Ultimately Android Studio would be better but I’m pretty sure it is still kind of complicated.
Would you mind telling me if you have managed to combine VTK for Android with ndk?
Lonni,
Lets followup about this on the mailing list.
Lonni,
To be more clear we have been working on using gradle and android studio and are planning a new blog regarding developments there. We can also further discuss technical details on the mailing list rather than here in the blog comments.
Thanks
Hello Casey,
Just wanted to know how things were going with Android Studio and VTK. I still have a post on the mailing list about it and I was wondering how were the developments were going.
Sorry about the post on here, I just don’t have your email address to contact you directly
With Android Studio 2.1, I just upgraded the Android project directly from VES source, and then add the libKiwiNative.so file to jniLibs/armeabi-v7a. The KiwiViewer then compiles perfectly and works well (I am using Mashmallow).