SlicerCAT: Creating custom applications based on 3D Slicer


This blog presents a framework for making custom applications based on 3D Slicer.
What is 3D Slicer?
3D Slicer is a software platform for the analysis and visualization of medical images and for research in image guided therapy. It is free, open source, and cross-platform (Windows, macOS and Linux). The Slicer community maintains more than 150 extensions providing algorithms and tailored workflows for quantitative imaging research in brain tumors, prostate cancer, and lung cancer, among others.
Why customize?
Developers may want to create a 3D Slicer based application for a variety of reasons, including:
- Creating a streamlined and simplified UI for specific workflows
- Bundling frequently used extensions into an installer for an institution or organization
- Developing an application including custom or proprietary algorithms. To learn about use for commercial projects, see License section.
SlicerCustomAppTemplate
The SlicerCustomAppTemplate is a light weight customization wrapper around the core of the 3D Slicer application. It allows developers to customize Slicer including adding application branding, custom code and modules. A great example of the full range of features in the SlicerCustomAppTemplate is the SlicerSALT application. Now, we will walk through the creation of a simple custom application.
Workflow for creating a custom Slicer application:
- Generate the application framework from the template repository
- Customize the Slicer configuration using CMake (optional)
- Modify the application appearance (optional)
- Bundle extensions in the custom application (optional)
- Add new custom modules (optional)
- Build the custom app
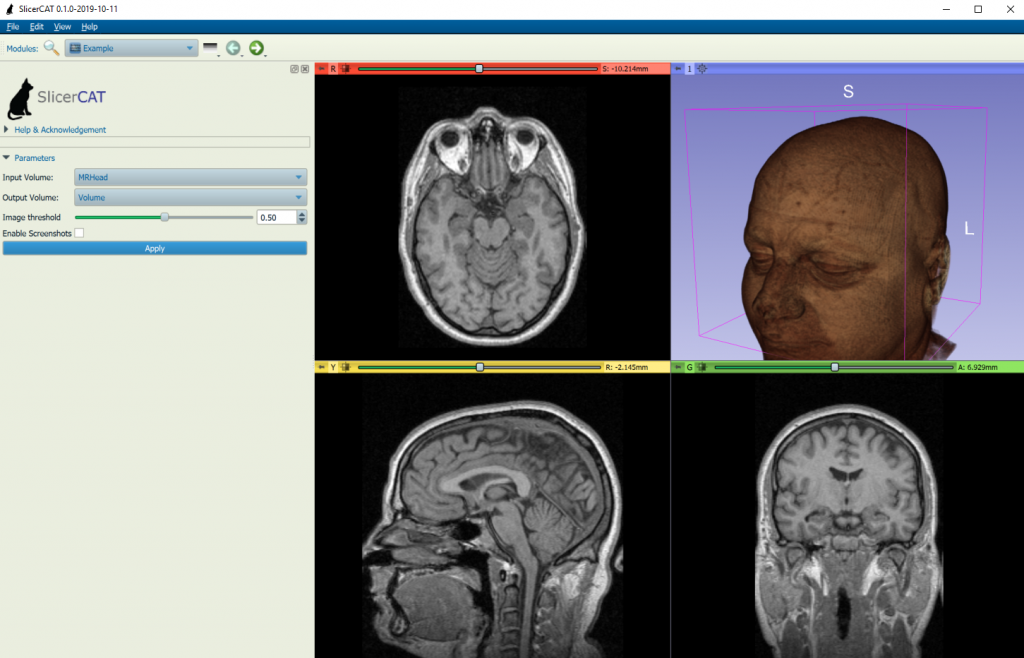
We will go through each one of these steps in detail. The code used to generate the slicer app present in the figures below can be found at https://github.com/KitwareMedical/SlicerCAT.
Step 1: Generate the application framework
To start using the template, you need to have python installed on your system. To get a custom 3D Slicer application started in a new repository, use the following code snippet:
pip install cookiecutter jinja2-github
cookiecutter gh:KitwareMedical/SlicerCustomAppTemplate
Fill in the information requested at the prompts. You will be asked to provide information such as the application name, organization name, etc. This information is used to customize the template.
Step 2: Customize Slicer using CMake options
The CMakeLists.txt file in the top level source directory provides many options to modifying the stock Slicer build. The first and most important setting defines which version of Slicer you want to build on:
include(FetchContent)
if(NOT DEFINED slicersources_SOURCE_DIR)
  # Download Slicer sources and set variables slicersources_SOURCE_DIR  and slicersources_BINARY_DIR
  FetchContent_Populate(slicersources
    GIT_REPOSITORY git://github.com/Slicer/Slicer
    GIT_TAG f4f510600a023120d5483a2310b609181cce4f72
    GIT_PROGRESS 1
    )
else()
  set(slicersources_BINARY_DIR ${CMAKE_CURRENT_BINARY_DIR}/slicersources-subbuild)
endif()
The GIT_TAG variable defines the git hash you want to use. By default, it is initialized to the latest commit in the Slicer repository by the template generator. This can be changed to point to an earlier commit, or to the tag of a Slicer stable versions (ex. “v4.10.2”). You can also change the tag to update to newer versions of Slicer later on.
Slicer CMake variables (i.e Slicer_BUILD_DICOM_SUPPORT) are also set in this file and are passed to the Slicer inner build. The Slicer build system has a 2-level build structure, the build system first downloads and compiles all of its dependencies (the outer build) and then compiles Slicer itself (the inner build). This structure called superbuild minimizes the effort needed for developers to configure and build Slicer, and ensures very precise dependency versioning. Top level settings (such as enabling/disabling DICOM support) can affect how dependencies are built.
Built-in modules can be selectively enabled/disabled to give full control of functionality. The default home module and the favorite modules list can also be specified.
Setting home / favorite modules:
# Default home and favorite modules
set(Slicer_DEFAULT_HOME_MODULE "Example")
set(Slicer_DEFAULT_FAVORITE_MODULES "Data, Volumes, Models, Transforms, Markups, SegmentEditor")
Enabling/disabling Slicer build settings:
# Slicer options
option(BUILD_TESTING "Build application test suite" ON)
option(Slicer_BUILD_DOCUMENTATION "Build documentation (Doxygen, sphinx, ...)" OFF)
option(Slicer_BUILD_DICOM_SUPPORT "Build application with DICOM support" OFF)
...etc...
Enabling / Disabling built-in modules:
# Disable Slicer built-in modules
set(Slicer_CLIMODULES_DISABLED
  )
set(Slicer_QTLOADABLEMODULES_DISABLED
  SceneViews
  SlicerWelcome
  ViewControllers
  )
set(Slicer_QTSCRIPTEDMODULES_DISABLED
  DataProbe
  DMRIInstall
  Endoscopy
  LabelStatistics
  PerformanceTests
  SampleData
  SurfaceToolbox
  VectorToScalarVolume
  )
...etc...
Step 3: Modify the application appearance
Step 3a: Logos and Appearance
Logos and icons are located in the Applications/CustomAppNameApp/Resources folder. The default images can be replaced (keeping the same file names) to brand the application. In the demo repository, the logos have been updated to be more CAT appropriate.
A Qt style class (qAppStyle) can be found in Applications/CustomAppNameApp/Widgets. This can be modified to override the built in Qt/Slicer Style.
Step 3b: Modify Slicer Menus
Modifying Applications/CustomAppNameApp/qCustomAppNameAppMainWindow.cxx allows the developer to control the visibility of menus, and make other modifications to the main Slicer UI:
// Hide the toolbars
this->MainToolBar->setVisible(false);
this->ModuleSelectorToolBar->setVisible(false);
this->ModuleToolBar->setVisible(false);
this->ViewToolBar->setVisible(false);
this->MouseModeToolBar->setVisible(false);
this->CaptureToolBar->setVisible(false);
this->ViewersToolBar->setVisible(false);
this->DialogToolBar->setVisible(false);
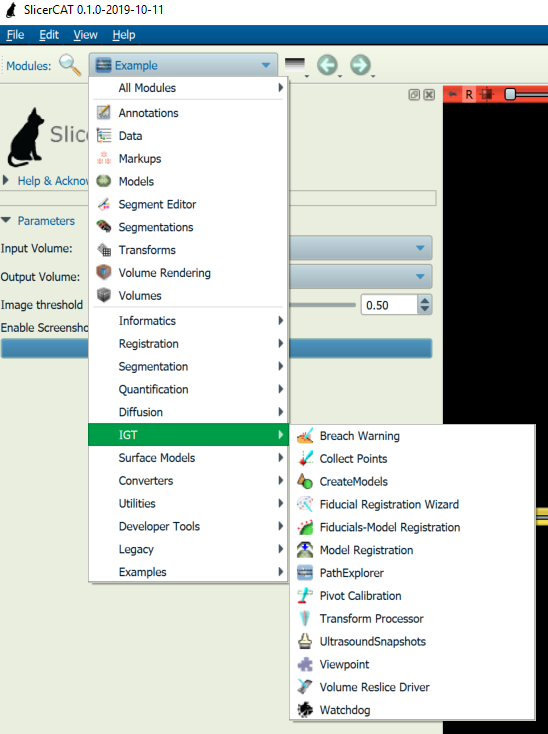
Step 4: Bundle External Extensions
Extensions, either created by you to encapsulate your own code (see tutorial here), or by the Slicer community can be directly downloaded and bundled by specifying the git repo for the extension in the top-level CMakeLists.txt file:
# SlicerIGT
set(extension_name "SlicerIGT")
set(${extension_name}_SOURCE_DIR "${CMAKE_BINARY_DIR}/${extension_name}")
FetchContent_Populate(${extension_name}
  SOURCE_DIR ${${extension_name}_SOURCE_DIR}
  GIT_REPOSITORY ${EP_GIT_PROTOCOL}://github.com/slicerigt/slicerigt.git
  GIT_TAG master
  GIT_PROGRESS 1
  QUIET
  )
list(APPEND Slicer_EXTENSION_SOURCE_DIRS ${${extension_name}_SOURCE_DIR})
The demo application bundles the SlicerIGT extension, which is used in many image guided therapy applications.
Step 5: Add Custom Modules
You can also add custom modules by placing the module code in the custom app repository and adding the module to the CMakeLists.txt:
# Enable/Disable Slicer custom modules: To create a new module, use the SlicerExtensionWizard.
set(Slicer_EXTENSION_SOURCE_DIRS
  ${SlicerCAT_SOURCE_DIR}/Modules/Scripted/Example
  )
The custom module included here is the example scripted module generated by the Slicer Extension Wizard. Tutorials for creating modules are here.
Step 6: Build the application
Once the project has been created, you need to build it using the same process/dependencies as 3D Slicer (see: https://www.slicer.org/wiki/Documentation/Nightly/Developers/Build_Instructions). The template also generates a README.md file with the build instructions.
License
The SlicerCustomAppTemplate is distributed under the Apache license, while Slicer itself is distributed under the BSD-style Slicer License. Both are permissive licenses that support unrestricted commercial use, with attributions. Any custom code added to a Slicer custom application can be licensed however the developer wishes.
Summary
This demo provides an overview of how developers can create custom applications based on 3D Slicer. Custom applications are a great way to leverage the power of 3D Slicer for your user’s needs, with minimal additional coding. Contact us at kitware@kitware.com to learn how we can help you create custom applications and integrate 3DSlicer-based software into your research, processes and products.
Can be built this project for IPad / IOS ? What would be the proper options for compiling for IPad ?
Hi. I have followed the instructions given in this post. But was unable to build a customized Slicer.
Then, without modifying any logos and options in CMakeLists.txt, I tried to build from the default given in KitwareMedical/SlicerCustomAppTemplate.
But, I couldn’t get it to work. Please suggest any new instructions/updates regarding custom Slicer build.
I’m struggling as this is the only source for instructions of building customized 3D Slicer on the internet and its not working for me.
Thanks.
I have followed these instructions and was unable to get it to work. Please help
Hi Karthik,
Thanks for reporting the issue.
To better help you, I suggest you follow up on the Slice forum. Based on this posting, it looks like you already found your way. See https://discourse.slicer.org/t/creating-a-custom-3d-slicer/21245
If not, do not hesitate to comment on the existing thread already available in the forum.
Thanks,